
Setting Up the Network (Network, NAT, Firewall)
This guide describes the one-time basic network setup in the nEC: creating a routed network, setting up a NAT rule for internet access, and creating a firewall rule. Afterwards, you can create your first VM.
Prerequisite: you are already logged in to VMware Cloud Director and have access to an Edge Gateway.
Preparation: important information for the next steps
Section titled “Preparation: important information for the next steps”To perform the following steps, you first need some data. The next two sections explain how to obtain or read this data.
Determining the network range and network address
Section titled “Determining the network range and network address”-
In the main menu, click
Networkingand then theEdge Gatewaystab. -
Click your
Edge Gateway. -
In the Edge Gateway menu, click the
IP Allocationtab under theIP Managementmenu item.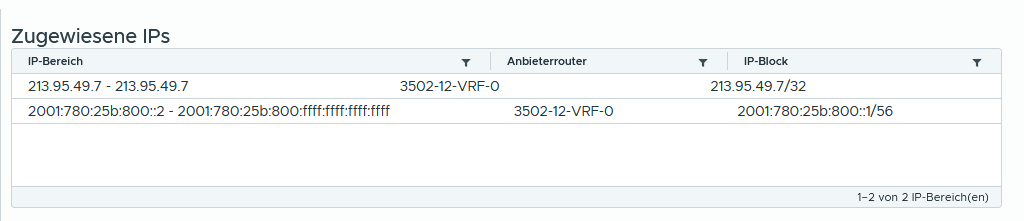
-
Now note down the following information:
-
IP Range of the IPv6 address. In this example:
2001:780:25b:800::2to2001:780:25b:800:ffff:ffff:ffff:ffff(the first usable address starts at2, since the first address2001:780:25b:800::1is reserved for the gateway, see theIP Blocktab). -
IPv6 scope, in this example
2001:780:25b:800::/56, visible in the “IP Block” column. -
IPv6 gateway address, readable in the
IP Blocktab. In this example:2001:780:25b:800::1/56. You can choose any network from this prefix, note, however, that the first /64 network is used as the service network within your Edge Gateway and is therefore unavailable. Choose a different network from the prefix, e.g.2001:780:25b:801::/64.Network / IP address Description 2001:780:25b:800::/56(2001:780:25b:800::1to2001:780:25b:8ff:ffff:ffff:ffff:ffff)Your IPv6 scope for use within the nEC 2001:780:25b:800::/64(2001:780:25b:800::1to2001:780:25b:800:ffff:ffff:ffff:ffff)First /64 network from your scope/prefix, used as the service network within the Edge Gateway and therefore internally reserved. 2001:780:25b:801::/64(2001:780:25b:801::1to2001:780:25b:801:ffff:ffff:ffff:ffff)Second /64 network from your scope/prefix, can be used freely by you within the nEC. -
Public IPv4 address, readable from the
IP Blockcolumn. In this example:213.95.49.7/32. Every organization in the nEC has at least one IPv4 address; this is later used as the external IPv4 address for a NAT rule.
-
Determining the network address for the private network
Section titled “Determining the network address for the private network”For the later configuration of IPv4 IP pools and a NAT rule, you need the following information for your private network:
- the IPv4 address to be used as the gateway address by the Edge Gateway,
- the network address (private network) per RFC 1918.
Example using an RFC 1918 network:
- Example IP address for the VM:
192.168.67.2/24 - Private network (network address): derived from the CIDR prefix, for a /24 network, the subnet covers addresses
192.168.67.0through192.168.67.255. The network address is therefore192.168.67.0/24. - IPv4 gateway address: in this example, the first usable host address in the subnet, i.e.
192.168.67.1/24.
Creating a new network
Section titled “Creating a new network”To be able to reach your VM, you need a network.
-
In the main menu, click
Networkingand thenNEW.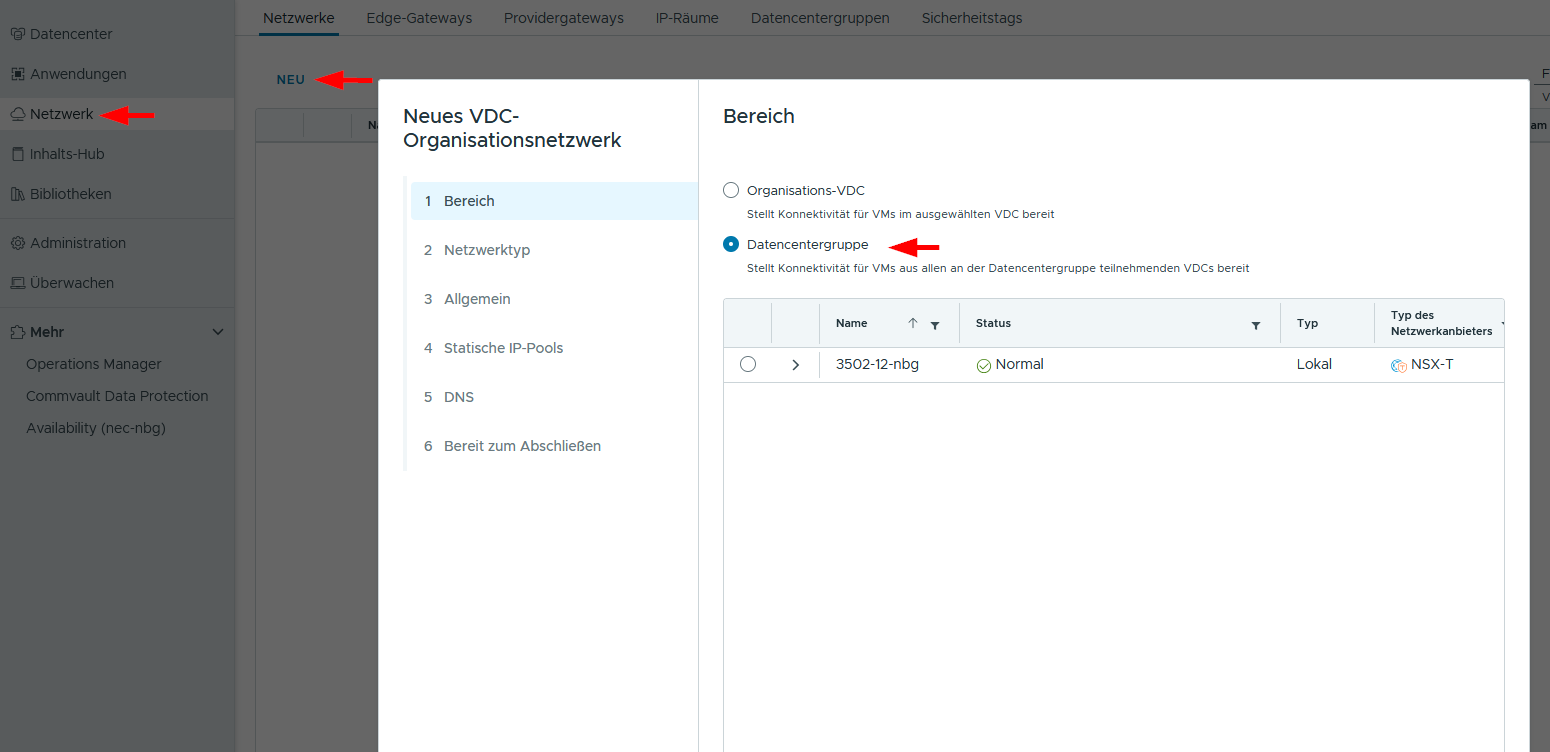
-
Choose the scope of your network:
Data Center Group. This makes it available across the entire Data Center Group, including all Data Centers within it. -
Choose the network type
routedso the new network is routed via the Edge Gateway. -
Enter a name for the new network, enable
Dual-Stack Mode, and enter the Gateway CIDR for both IPv4 and IPv6. The remaining settings are optional. ClickNEXT.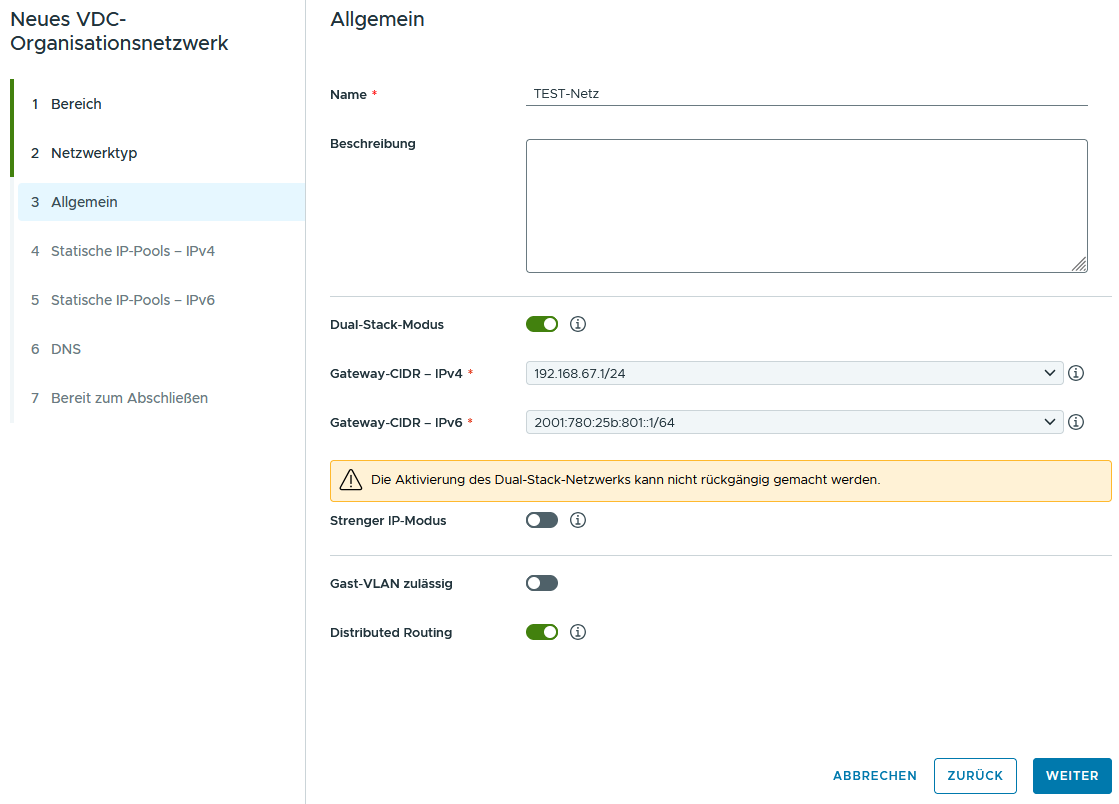
-
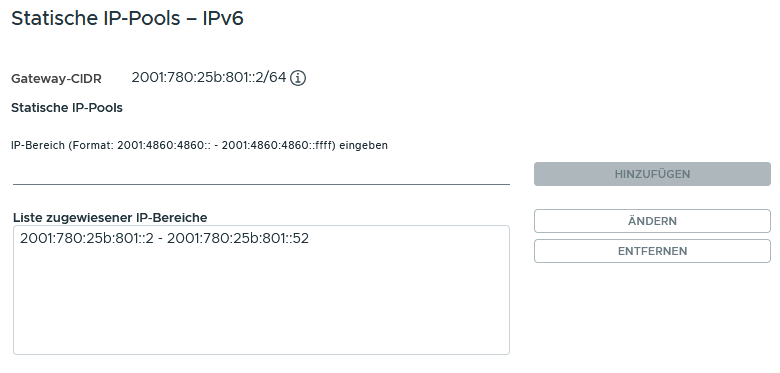
Optionally, in the next step you can configure static IP pools, enter the IP range in the specified format, click
ADD, and thenNEXT. These IP pools can later be used for new VMs as part of automatic IP address assignment. Stick to the previously noted IPv6 IP range, since IPv6 addresses on the public network are routed directly (without NAT); IPv4 addresses are private RFC 1918 addresses and are not publicly routed.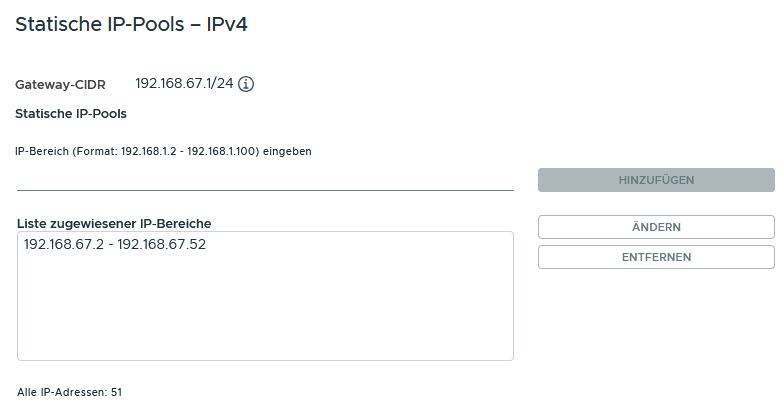
-
Optionally, you can specify
Primary DNS,Secondary DNS, and aDNS suffix, e.g. the noris DNS servers. -
Confirm the summary with
FINISH. The network is created.
Creating a NAT rule
Section titled “Creating a NAT rule”To reach resources on the internet from the private RFC 1918 network via IPv4, a NAT must be set up.
-
In the main menu, click
Networkingand then theEdge Gatewaystab. -
Click your
Edge Gateway. -
Under
Services, click theNATtab. -
Click
NEW. -
Give the NAT rule a suitable name.
-
For the
NAT action, choose SNAT. -
For the
ExternalIP, use the public IPv4 address you noted earlier. For theInternalIP, use the network address of your private network (IPv4).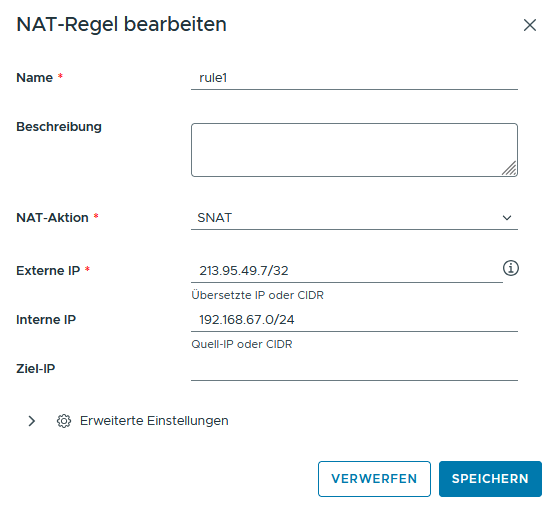
-
Check the details and click
SAVE.
You have now successfully created a NAT rule.
Creating a firewall rule
Section titled “Creating a firewall rule”To access resources outside your new network, corresponding rules must be created to allow this.
-
In the main menu, click
Networkingand then theEdge Gatewaystab. -
Click your
Edge Gateway. -
Under
Services, clickFirewall. -
Click
NEW. -
Give the firewall rule a suitable name.
-
Under
Source, click the pencil icon, this opens a new window. -
Click the
Firewall IP Addressestab and enter the IPv6 network address and the network address of your private network (IPv4) you noted earlier.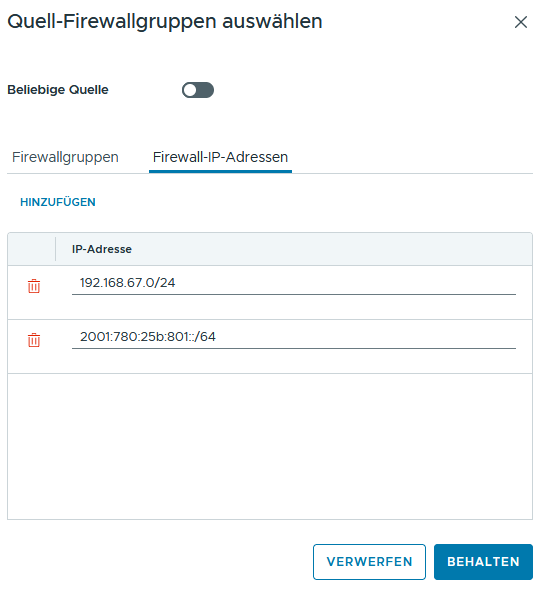
-
Under
Destination, setANY. -
For
Action, setAllow. -
For
IP Protocol, chooseIPv4 and IPv6. -
Check the details and click
SAVE.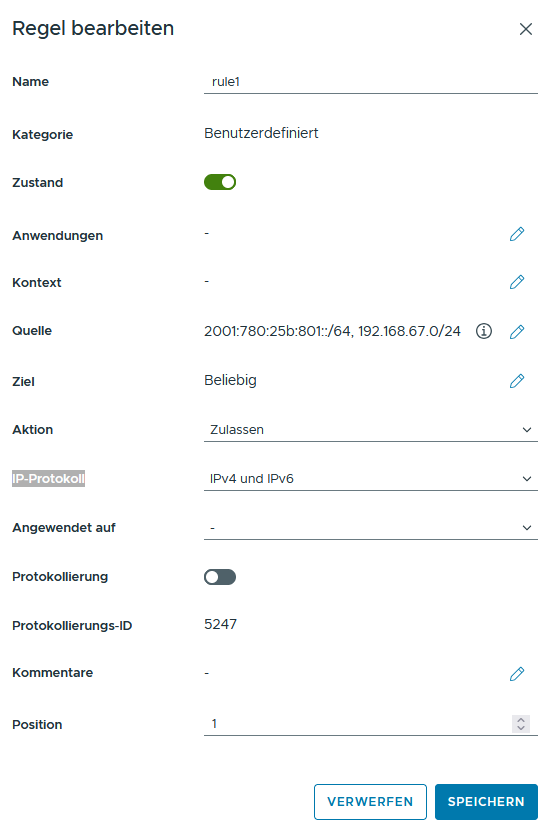
You have now successfully created a firewall rule.
Next step
Section titled “Next step”Your network is now ready. Create your first virtual machine on it: Creating a VM.