
OpenStack
The noris Sovereign Cloud (nSC)‘s OpenStack enables users to provision computing, storage, and networking resources. In addition to block storage, we also offer S3 Object Storage. You can find more information in their documentation.
Getting started
Section titled “Getting started”This section will walk you through the steps to create, access, and manage your first virtual machine with nSC.
Using the Webinterface
Section titled “Using the Webinterface”Our dashboard in Nürnberg (“NBG”) is available here: dashboard.nbg.nsc.noris.cloud. Log in with the provided user from your sign-up email, the domain field stays empty.
If you are more familiar with using the CLI, you can find the pertaining instructions below.
Overview
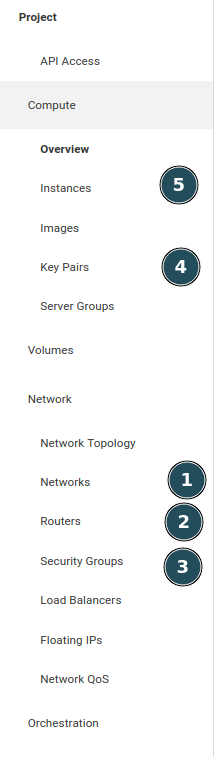
Section titled “Overview”Please note the navigation bar to the right: the menu items corresponding to the steps are highlighted with the respective numbers.
- Create a Network and Subnet
- Create a Router
- Create a Security Group
- Create an SSH Keypair
- Create a Compute Instance
- Connect Instance to the Internet
- Connect via SSH
Step 1: Create a Network and Subnet
Section titled “Step 1: Create a Network and Subnet”First we need to create a (virtual) network. The compute instance as well as the router will become part of that network.
Go to Network → Networks.
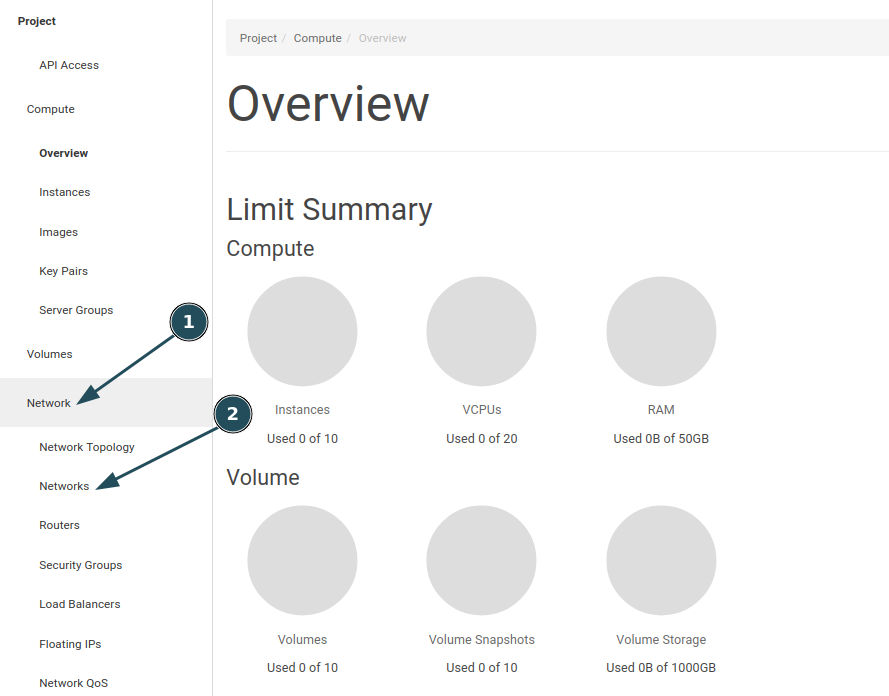
Hit Create Network.
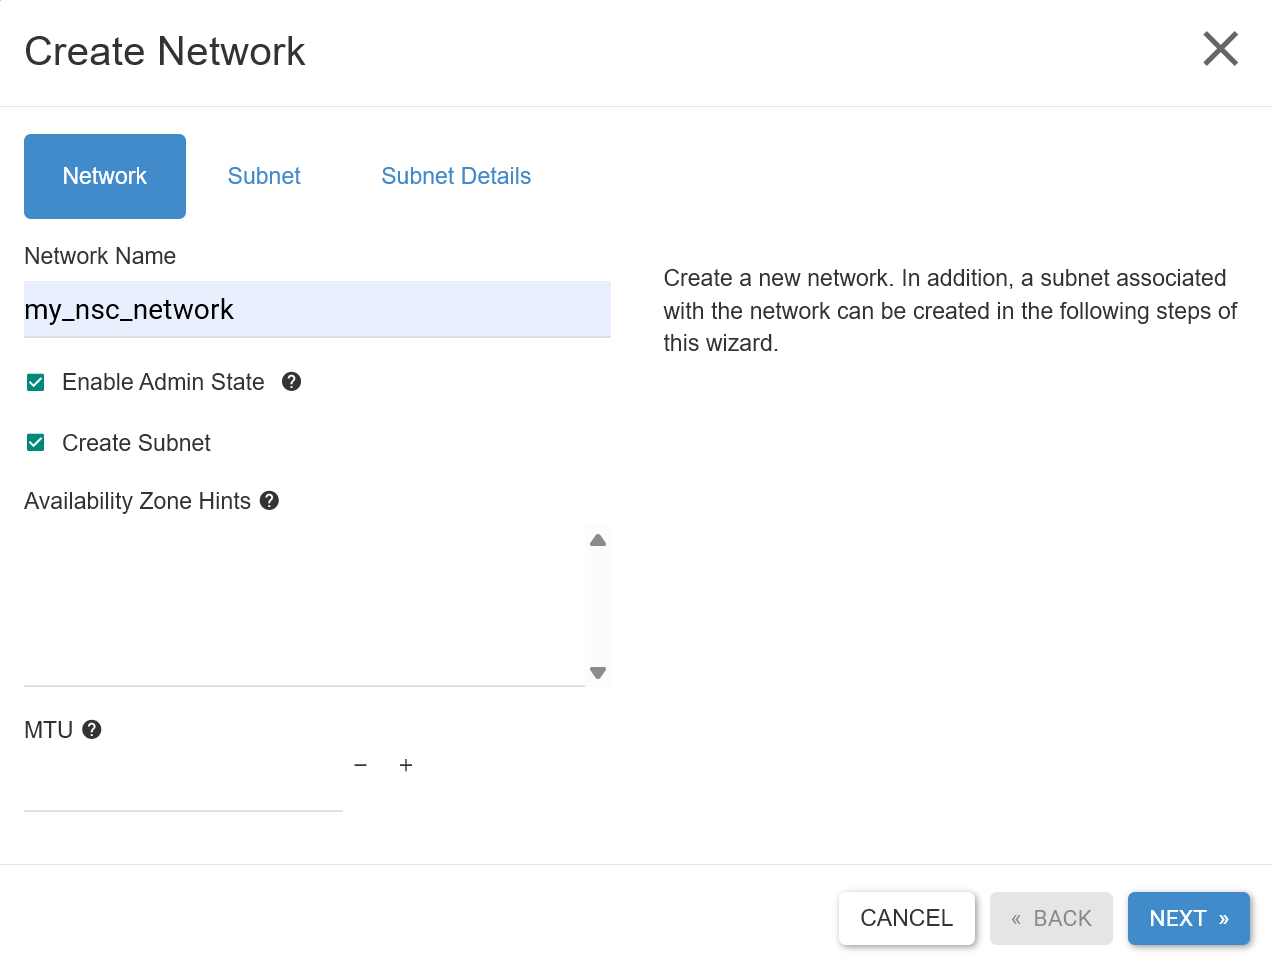
Give your network a name (for this guide we use my_nsc_network). This is your local network.
Enter the subnet’s name and define a subnet range to work with. If you need to configure a more complex network setup, there is documentation for IPv6-only and dual stack networking.
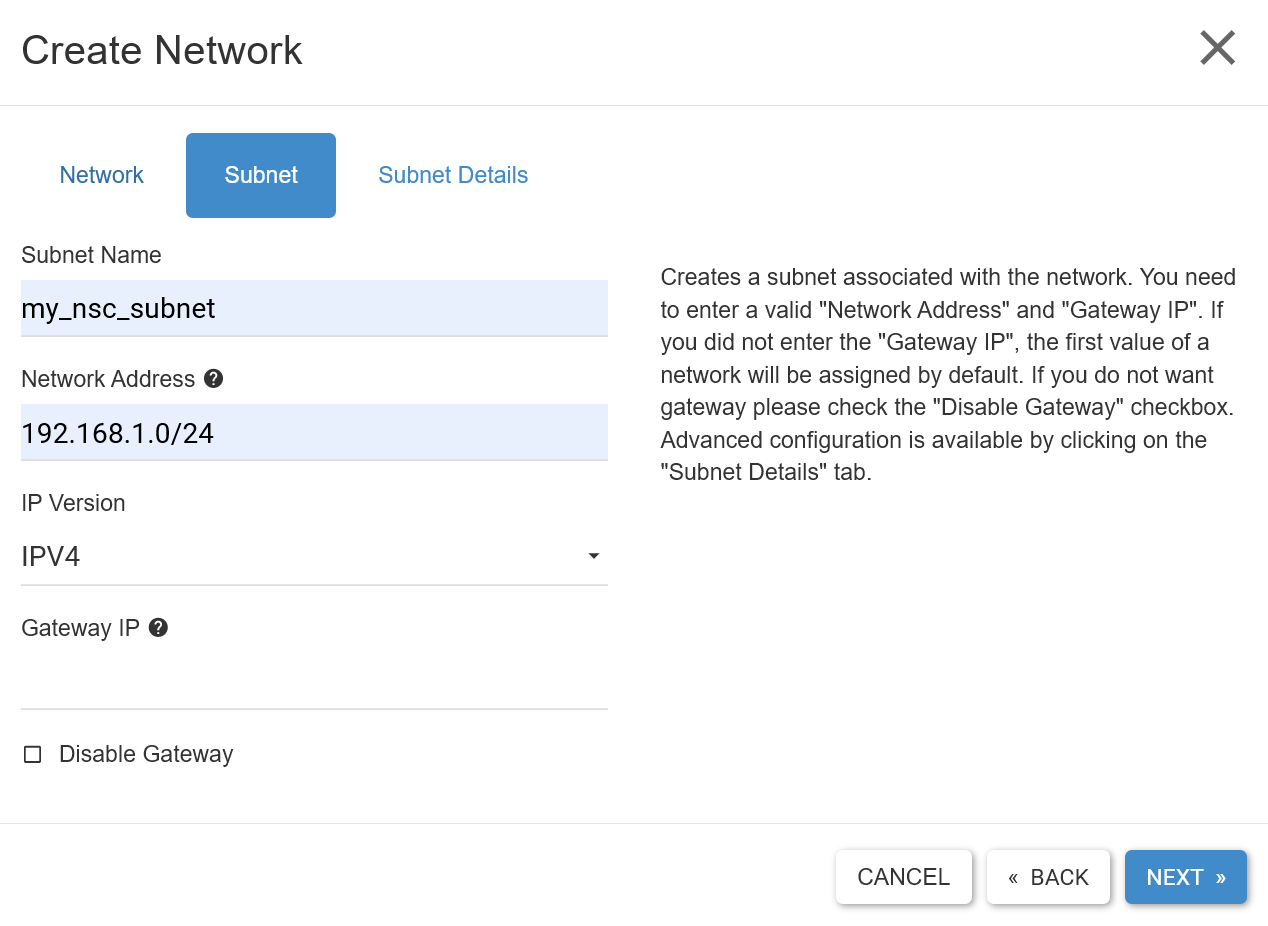
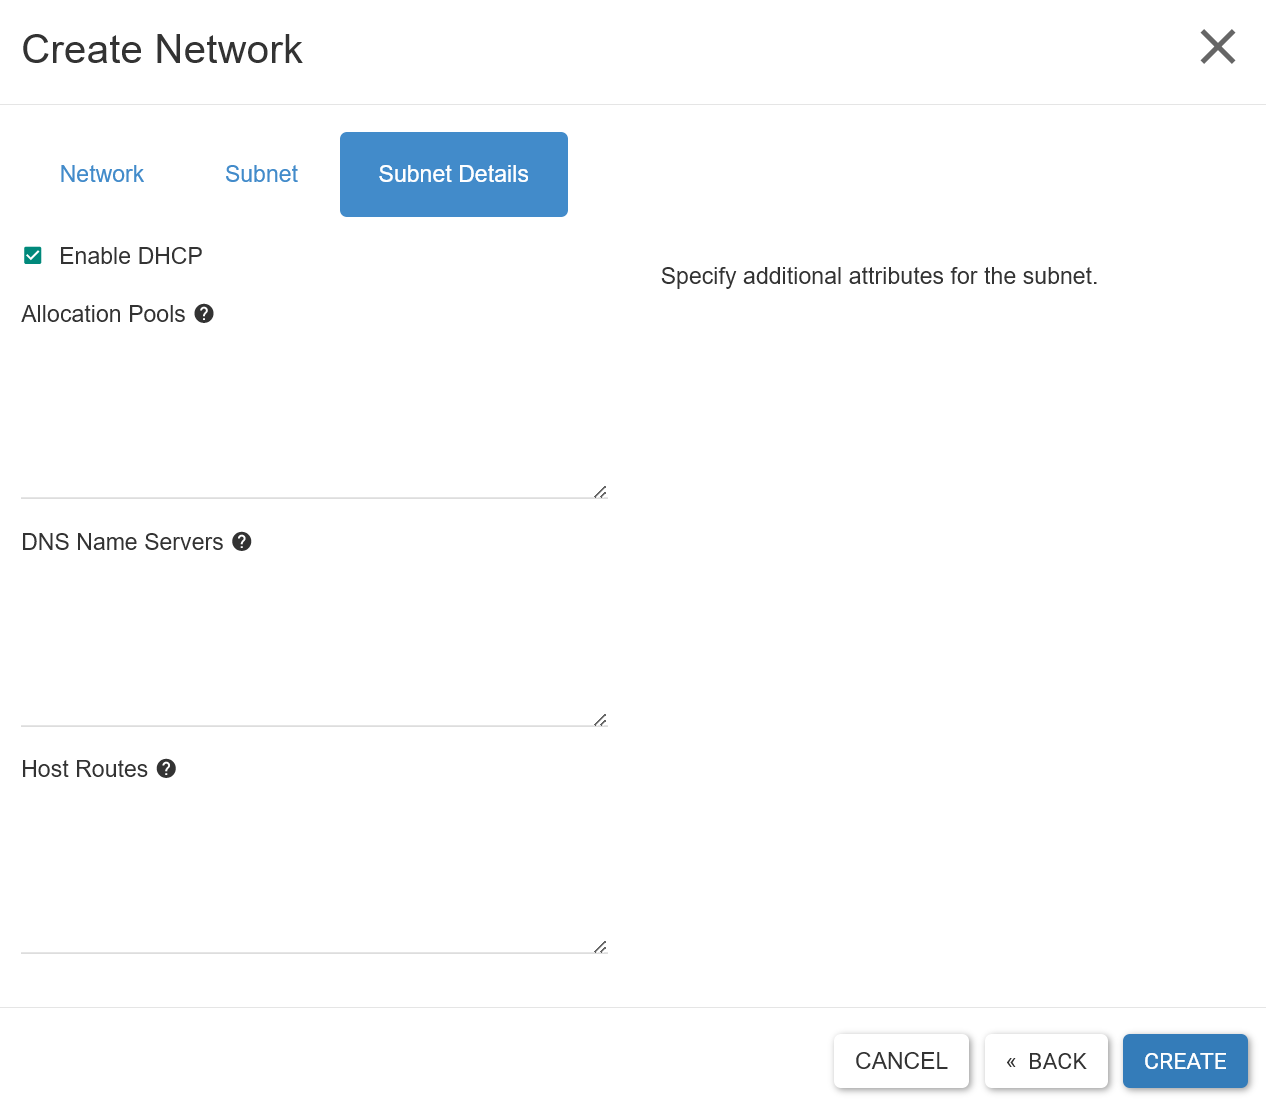
Leave Enable DHCP checked and hit CREATE.
Step 2: Create a Router
Section titled “Step 2: Create a Router”Secondly, a router will be created which is connected to both your network and the external network. This ensures WAN connectivity.
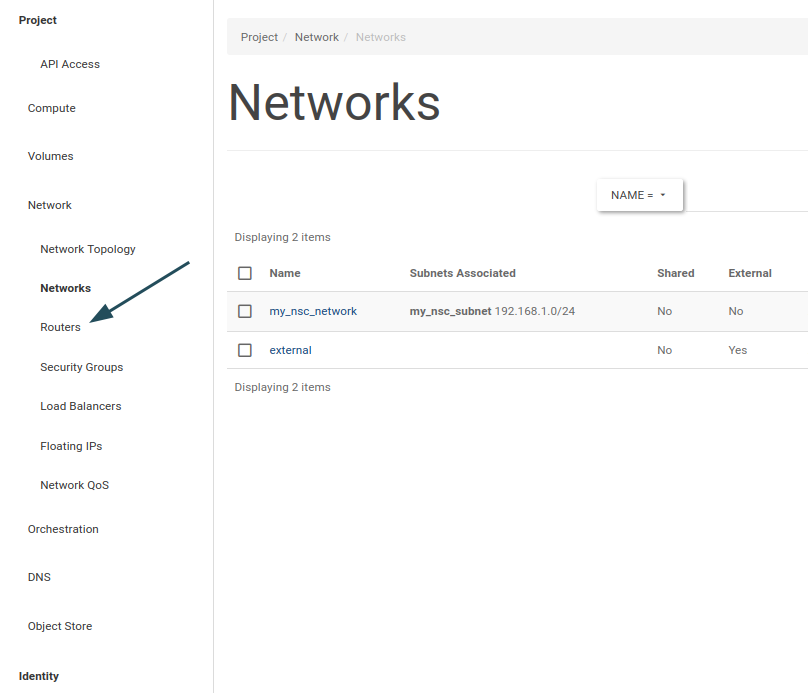
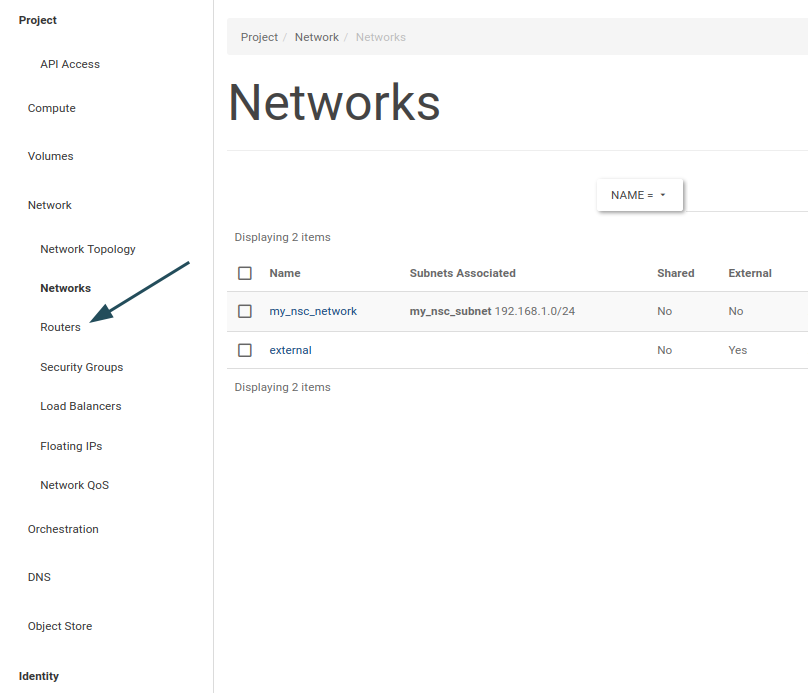
Navigate to Network → Routers.
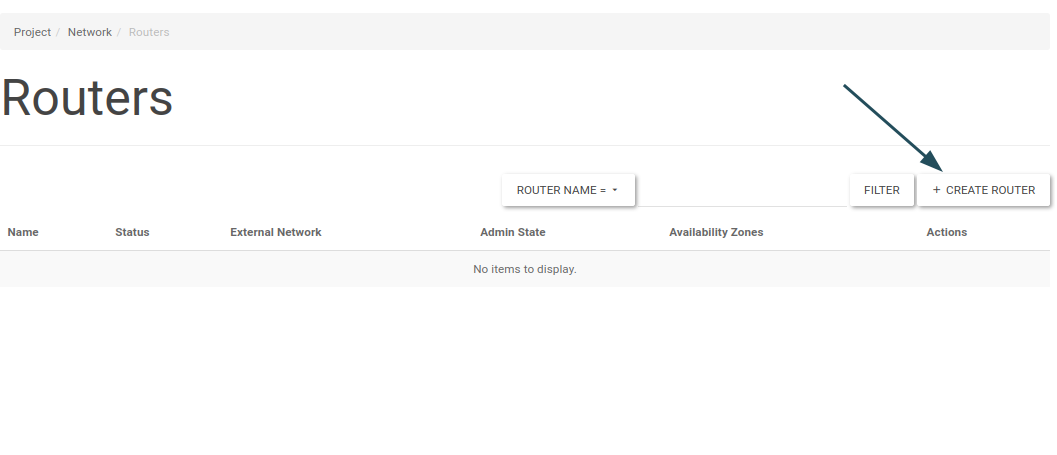
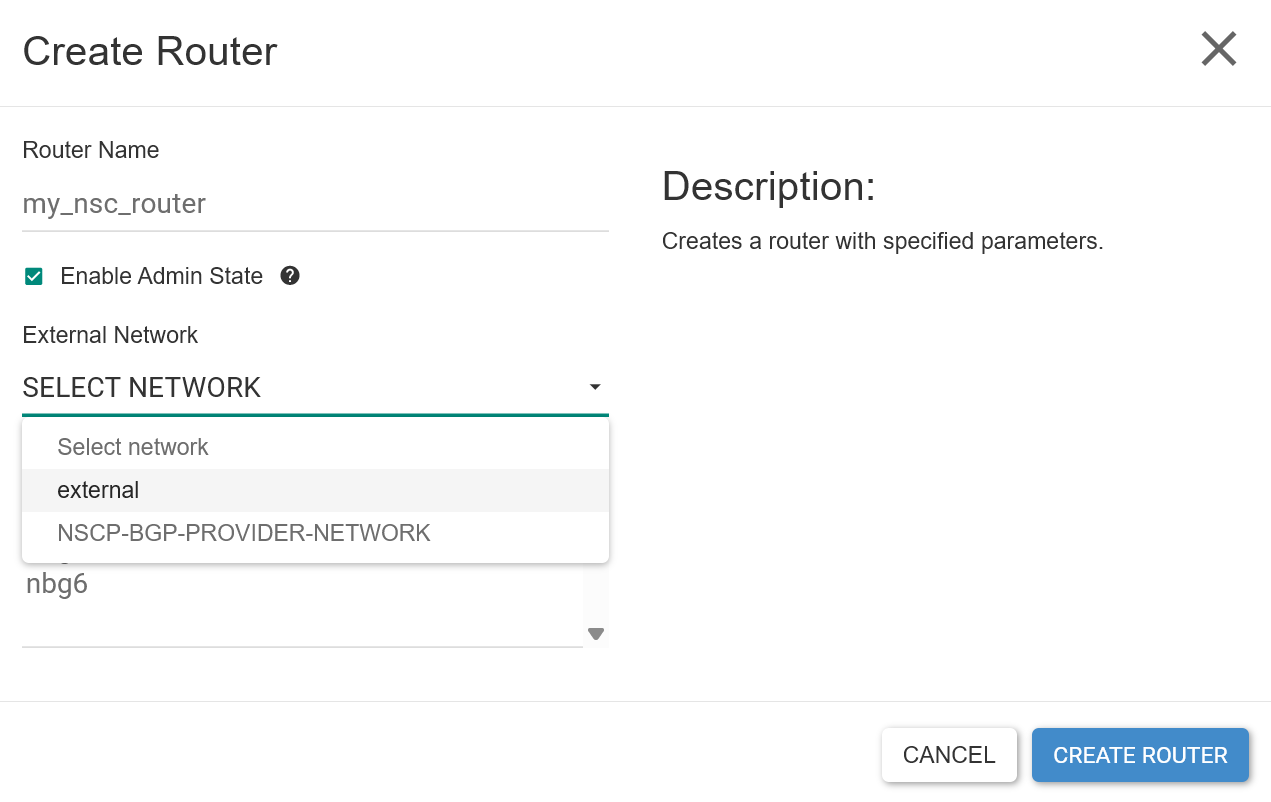
Hit CREATE ROUTER.
Choose a name and select the external network (the Public Network) under External Network. Finalize by clicking CREATE ROUTER.
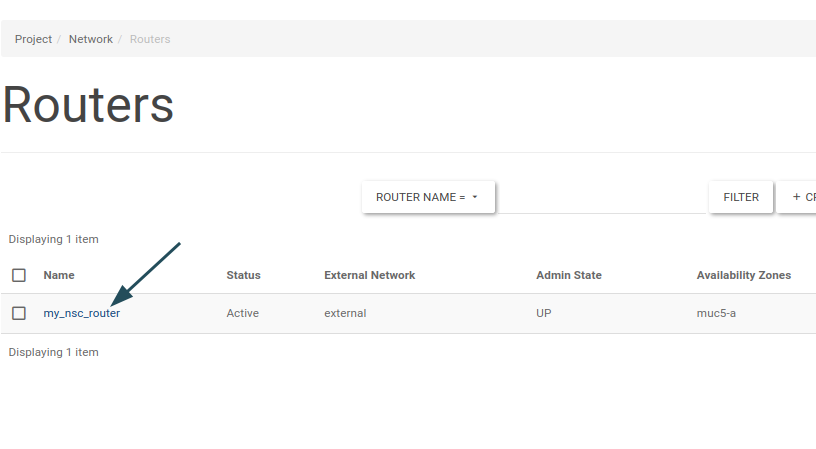
The virtual router instance will now be listed. Click upon its name:
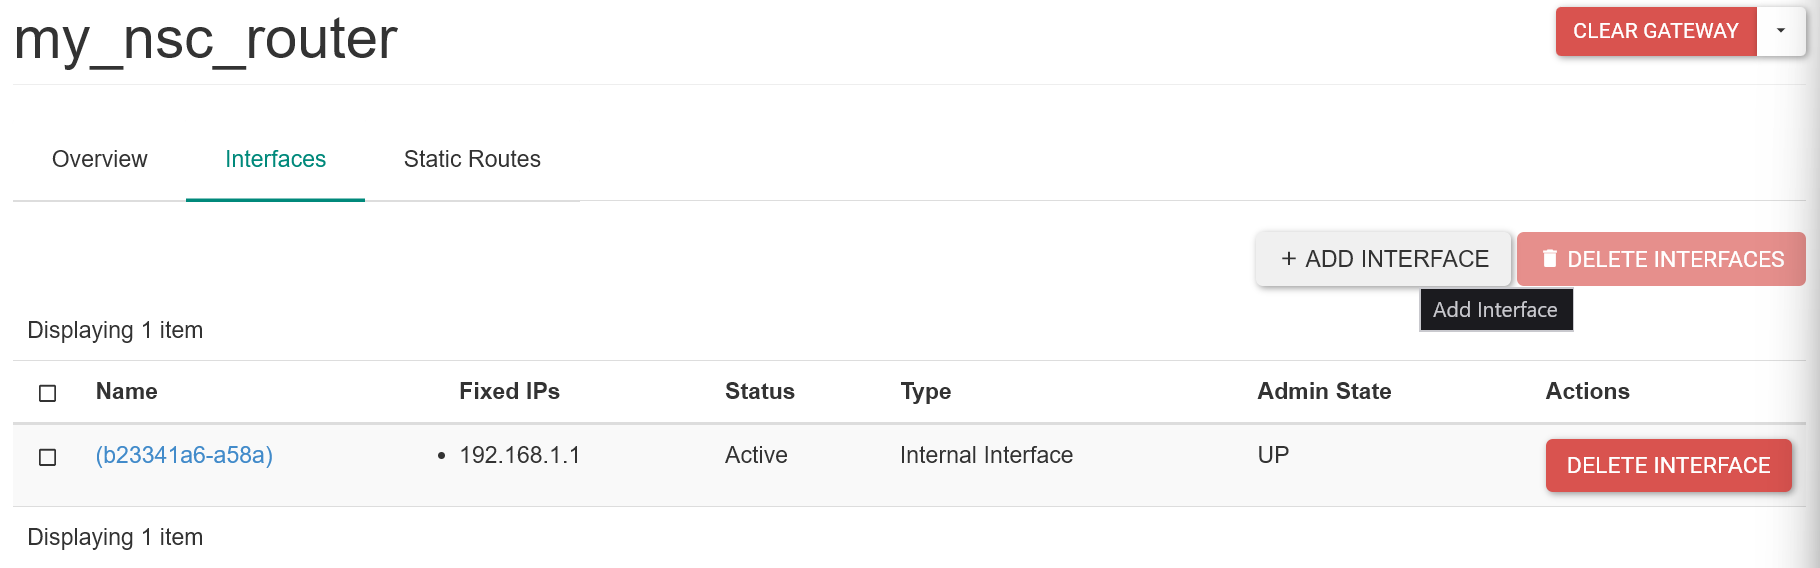
Navigate to the Interfaces tab and click ADD INTERFACE:
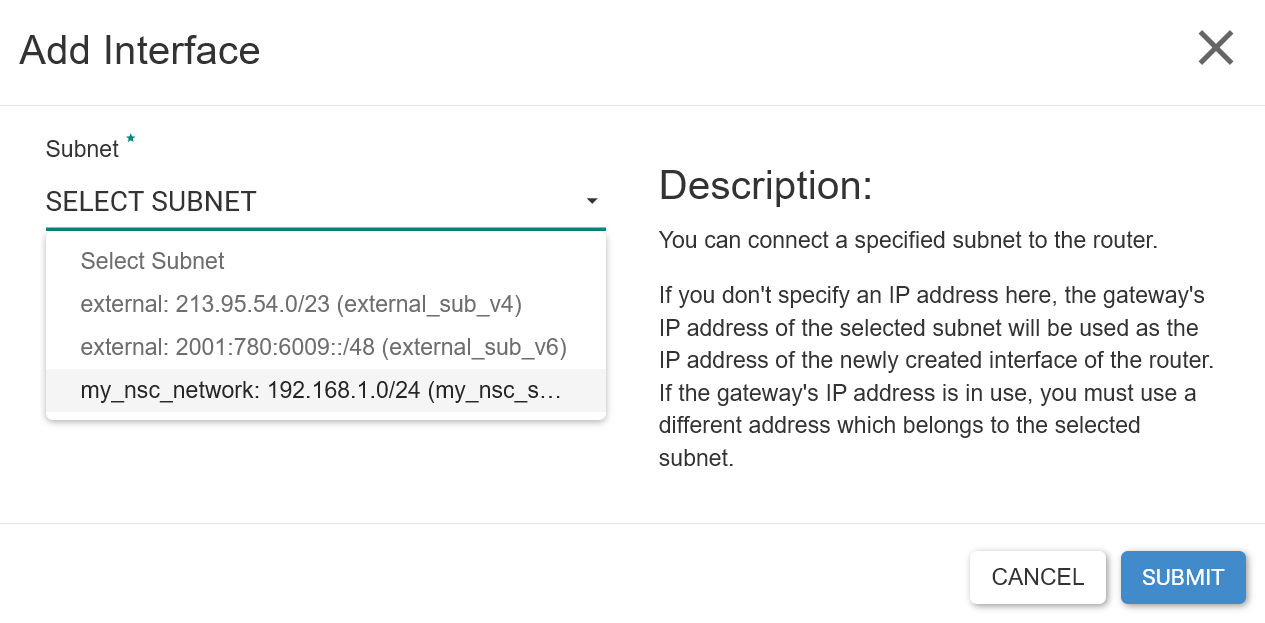
In the dropdown, choose our local network:
Check network overview
Section titled “Check network overview”Visually verify your changes in the Network Topology view under Network when you are done.
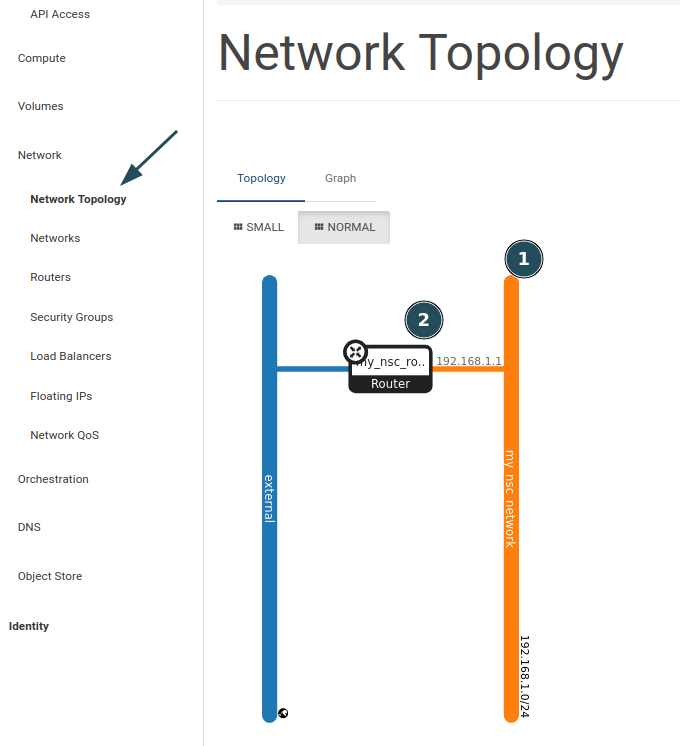
Step 3: Create a Security Group
Section titled “Step 3: Create a Security Group”By default, inbound traffic is restricted. In order to open up SSH access, we will create and apply a security group.
Navigate to Network → Security Groups.
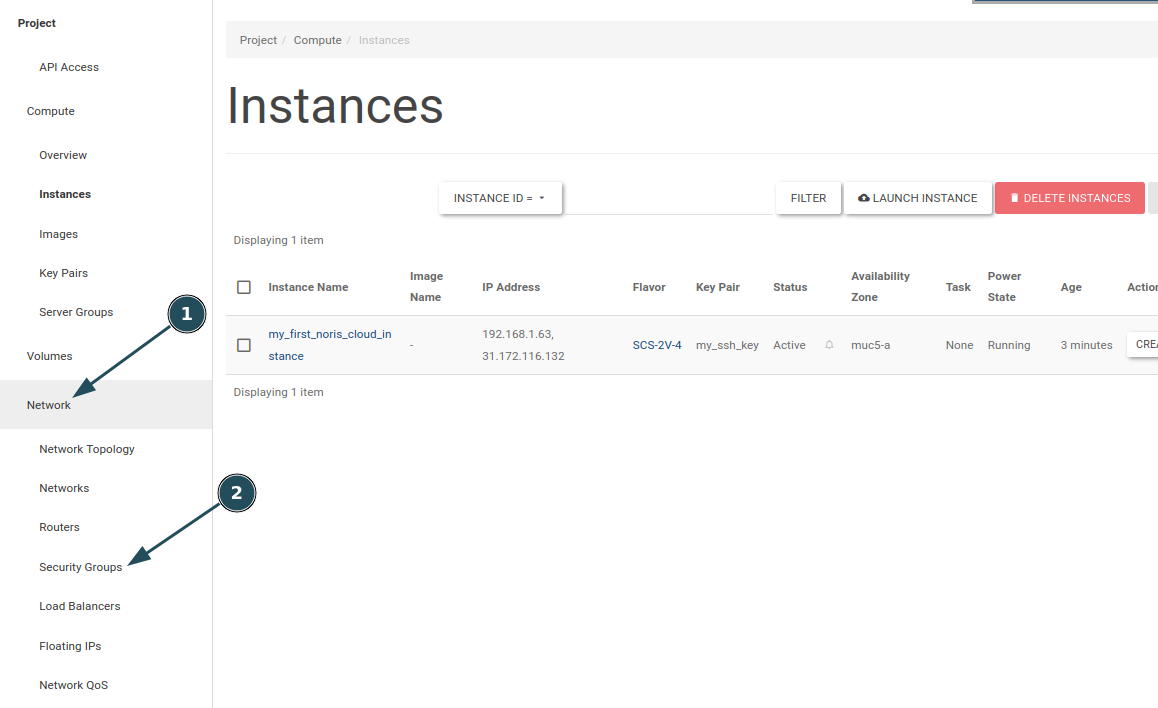
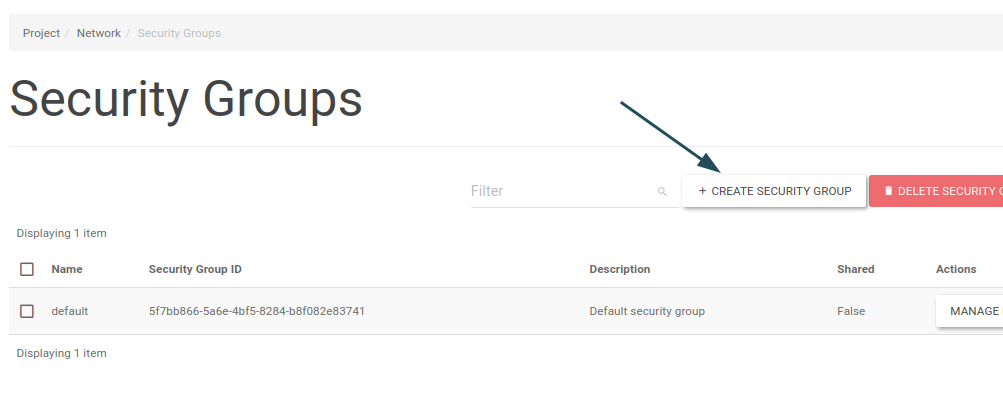
Click CREATE SECURITY GROUP.
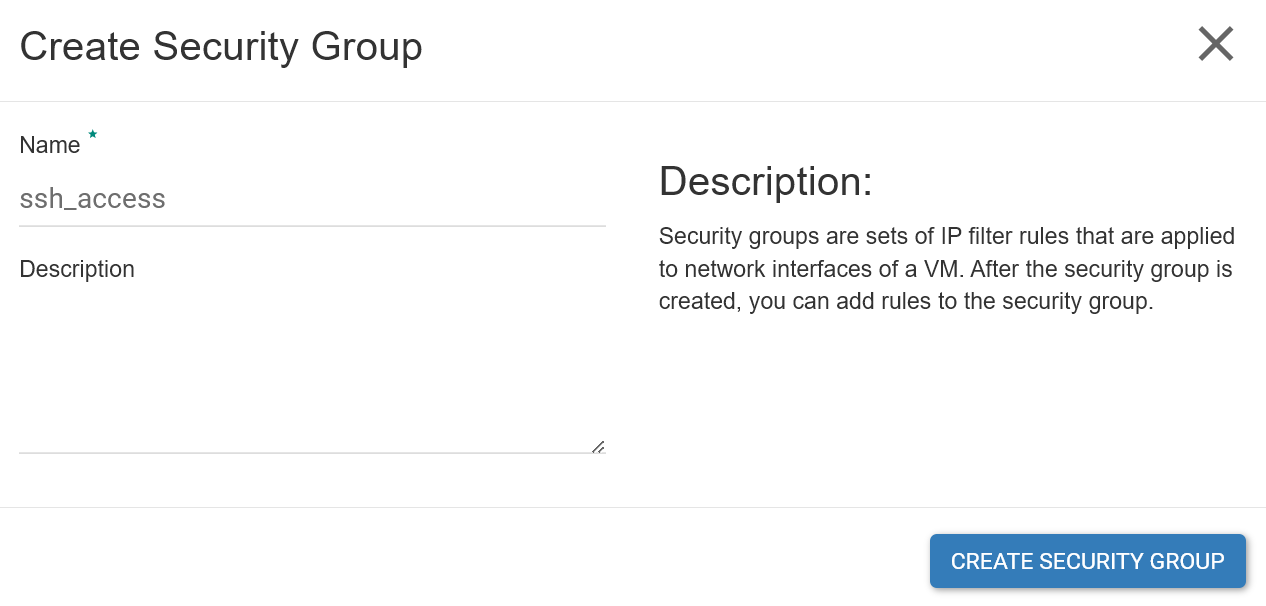
Give the security group a fitting name (and description, if needed), and click CREATE SECURITY GROUP:
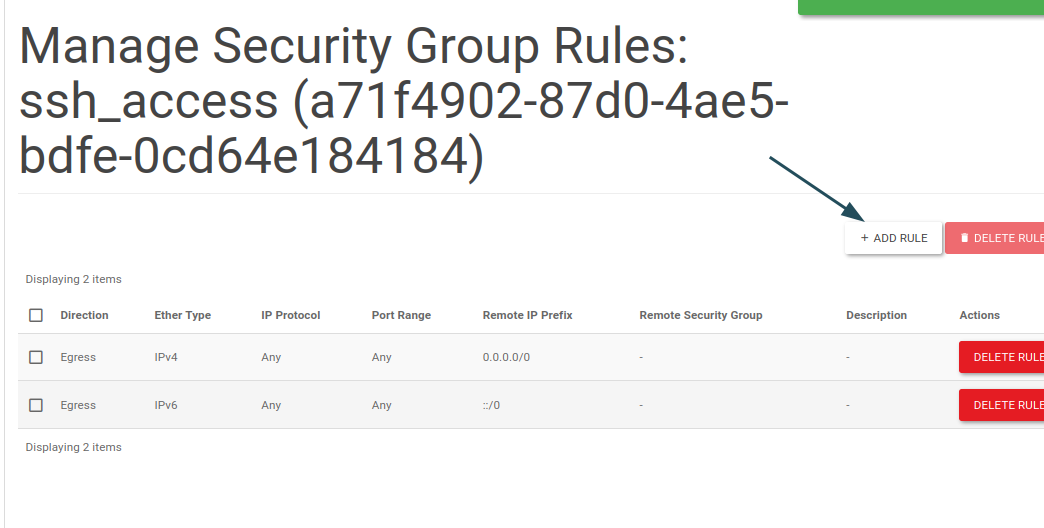
Click ADD RULE.
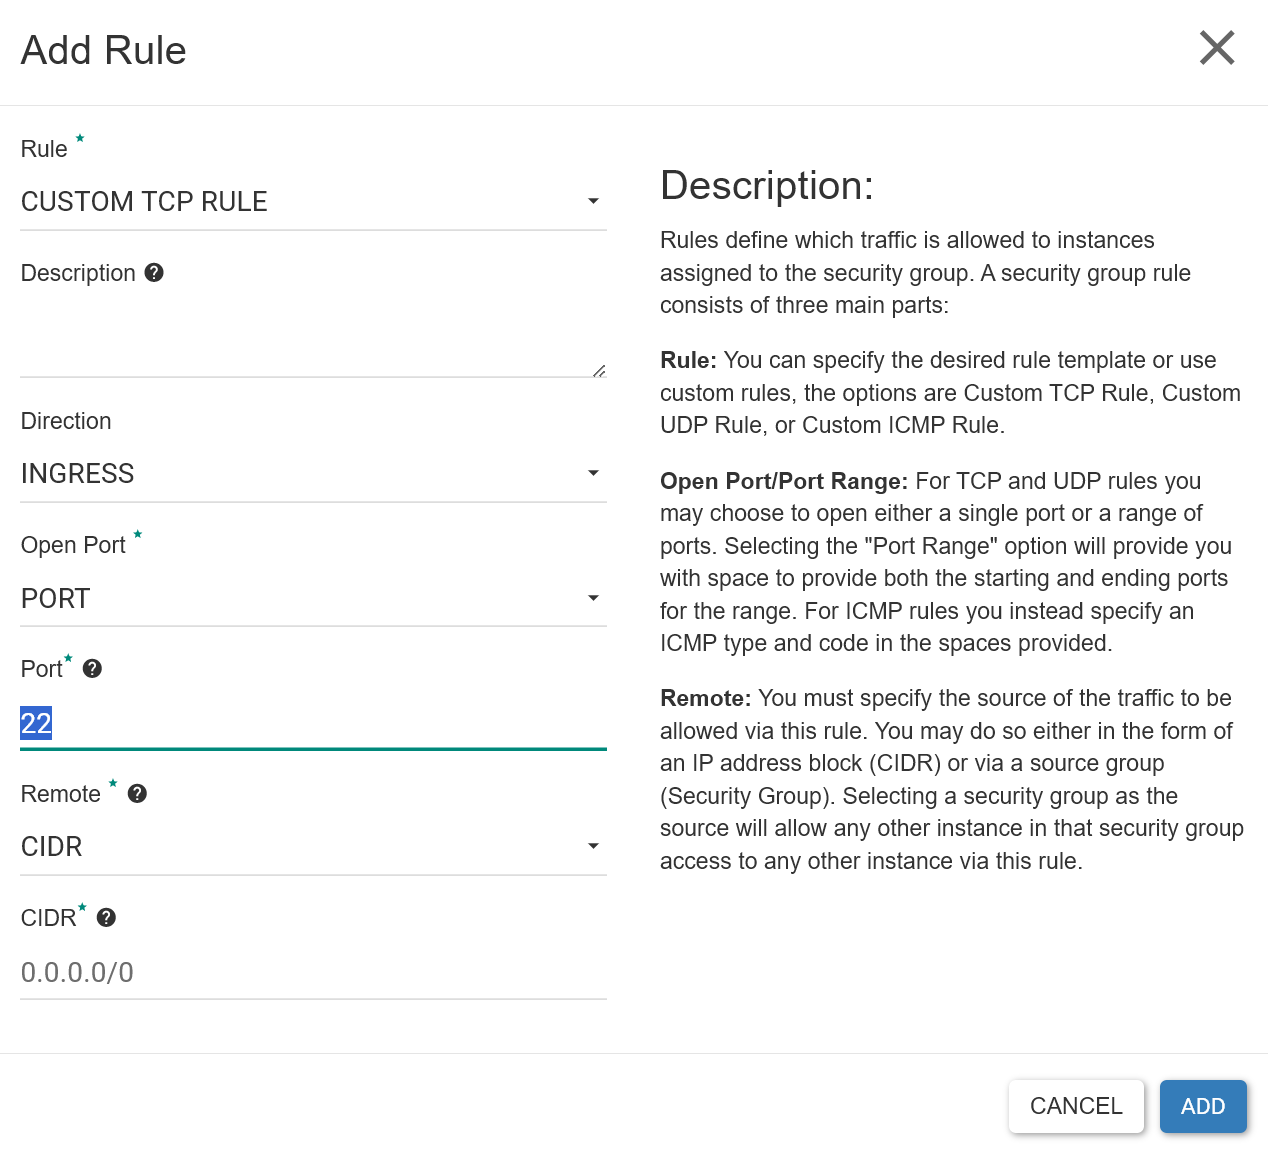
Enter port number 22 and hit ADD.
Step 4: Creating an SSH keypair
Section titled “Step 4: Creating an SSH keypair”SSH authentication will be passwordless via key, so we will have to set up key-based authentication. If you already have an SSH key, adjust the steps accordingly by using the IMPORT PUBLIC KEY button instead of CREATE KEY PAIR.
Navigate to Compute → Key Pairs and click CREATE KEY PAIR.

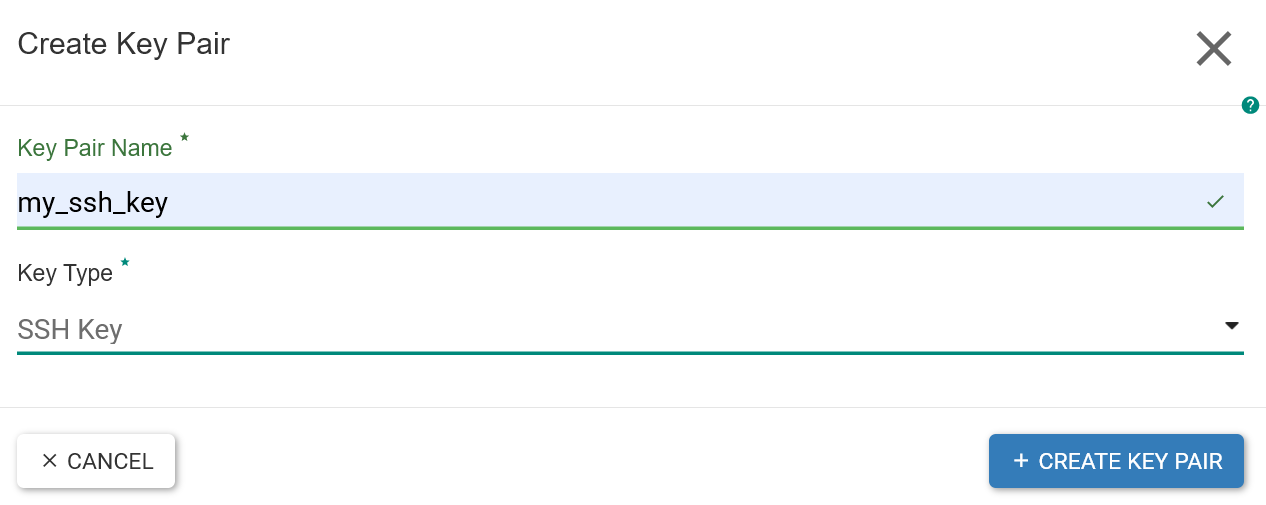
Choose a fitting name and select SSH Key in the Key Type dropdown menu. Finalize by clicking CREATE KEY PAIR. The key data will automatically be downloaded through your browser:
Step 5: Create a Compute Instance
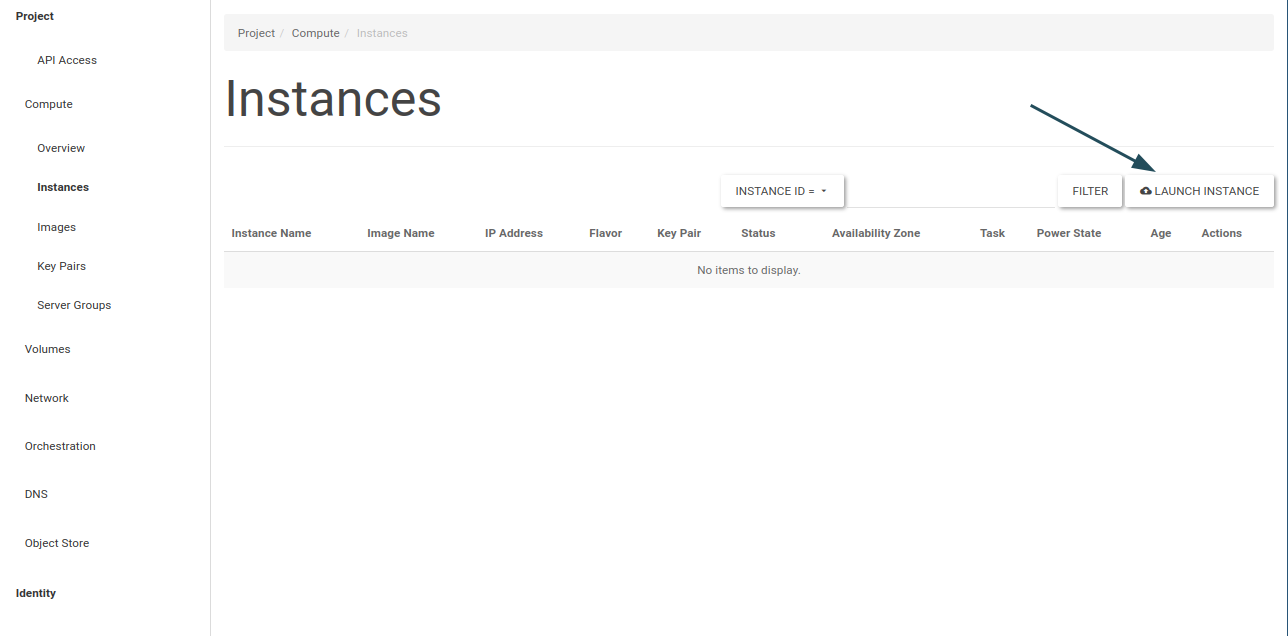
Section titled “Step 5: Create a Compute Instance”Navigate to Compute → Instances.
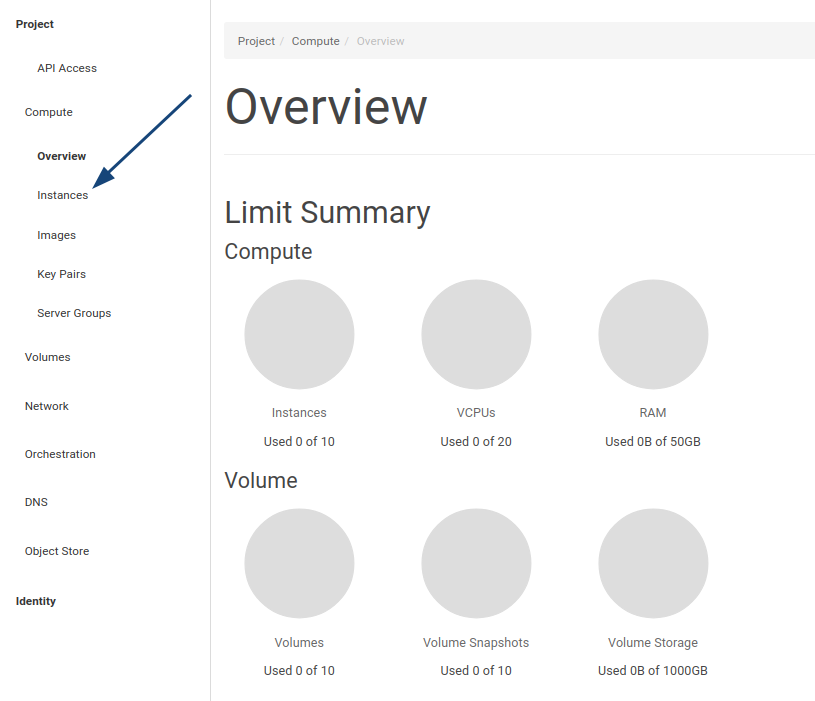
Hit LAUNCH INSTANCE.
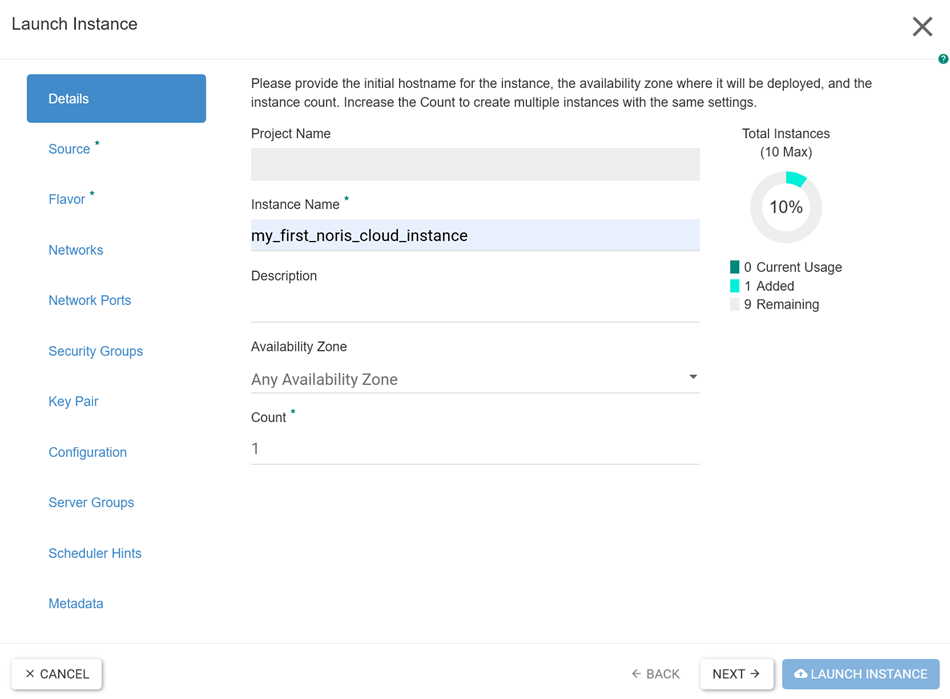
Choose a name and hit NEXT:
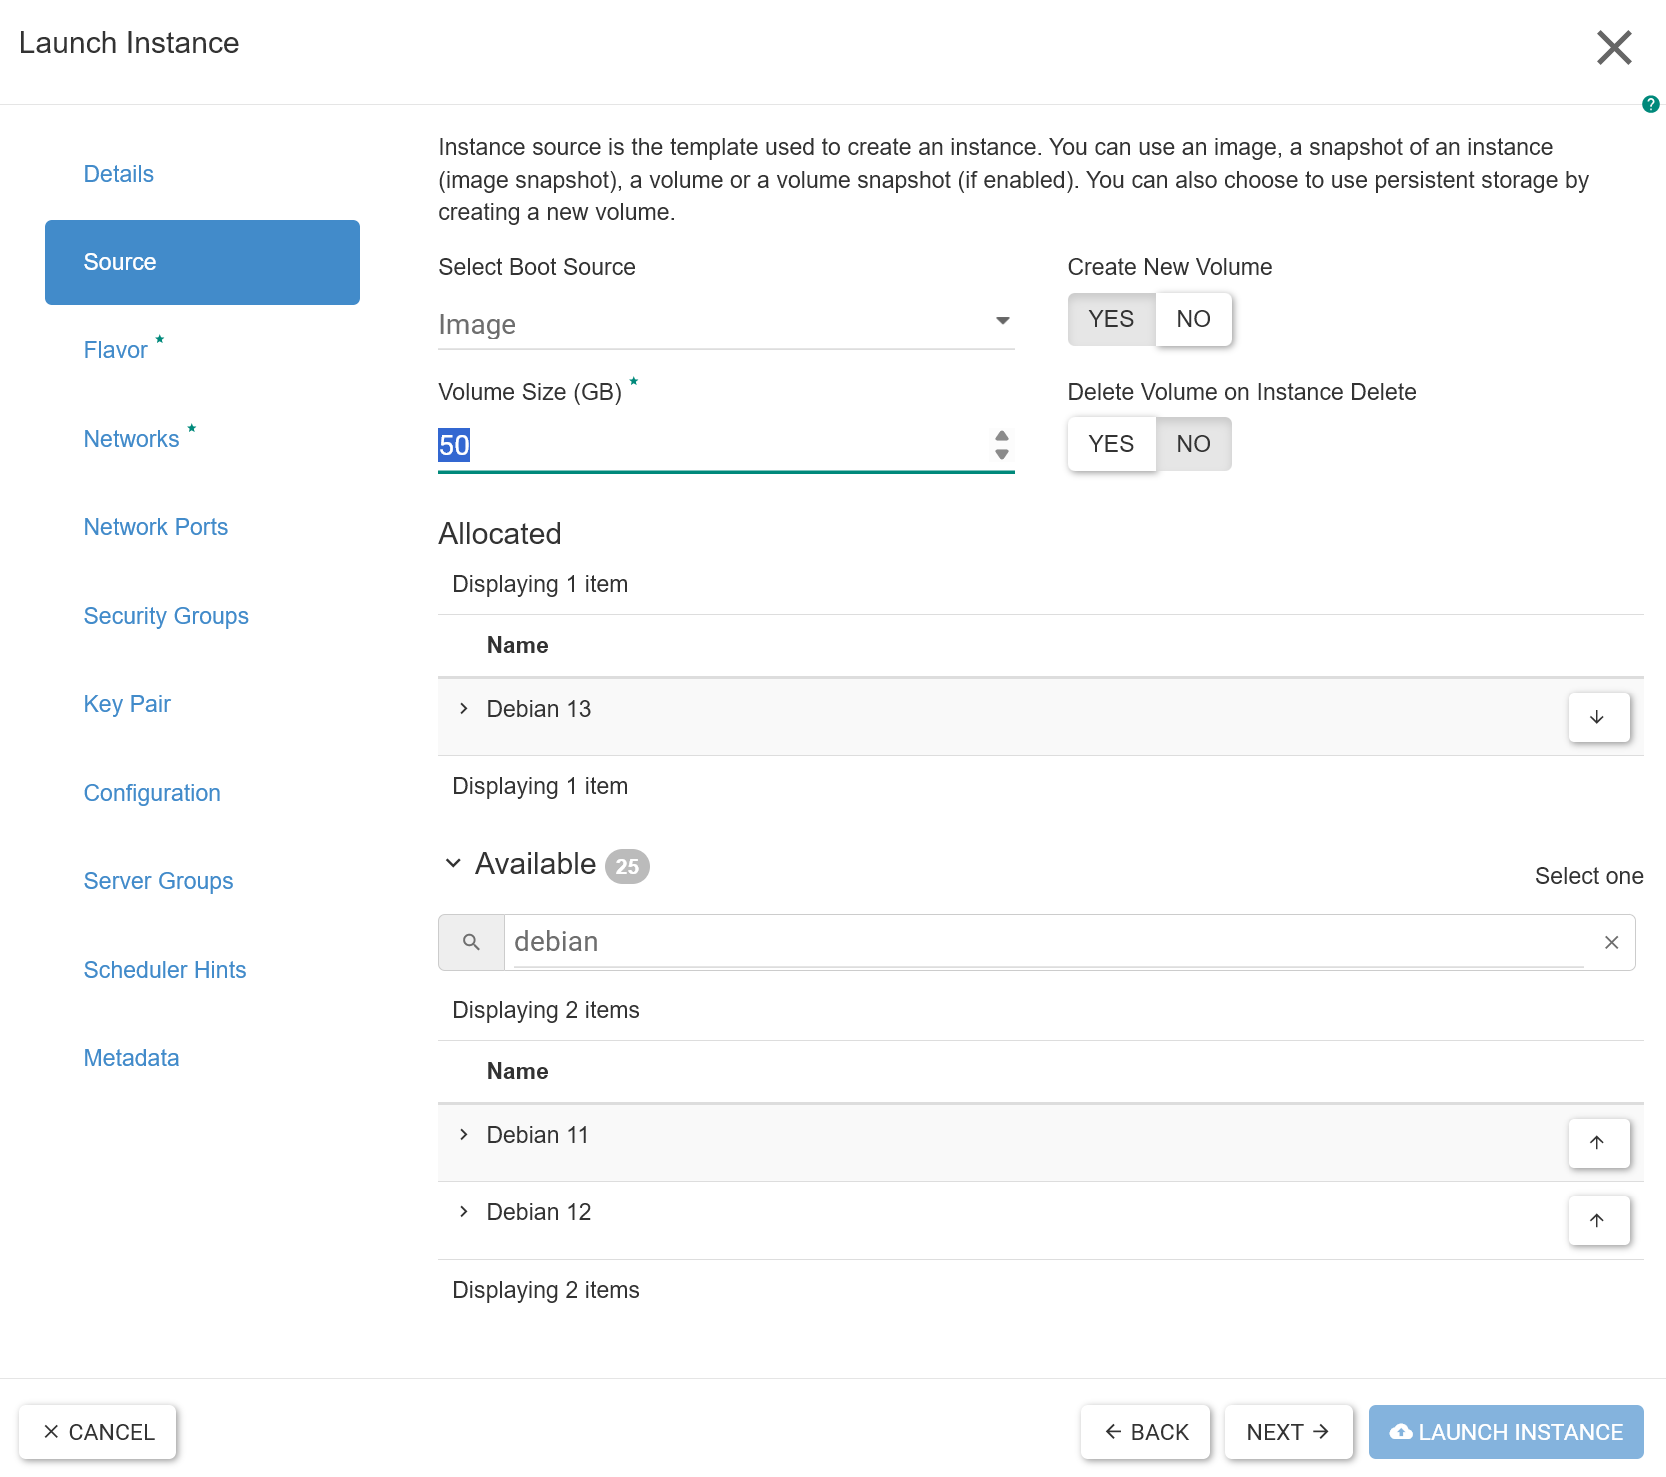
In this step you can freely declare your rbd_fast root volume’s size if using diskless (disk=0) flavors (recommended, see instance flavors below). If you are planning to use a LUKS root volume instead, see Create a VM using LUKS based root volume below. Afterwards, choose your OS image and click NEXT:
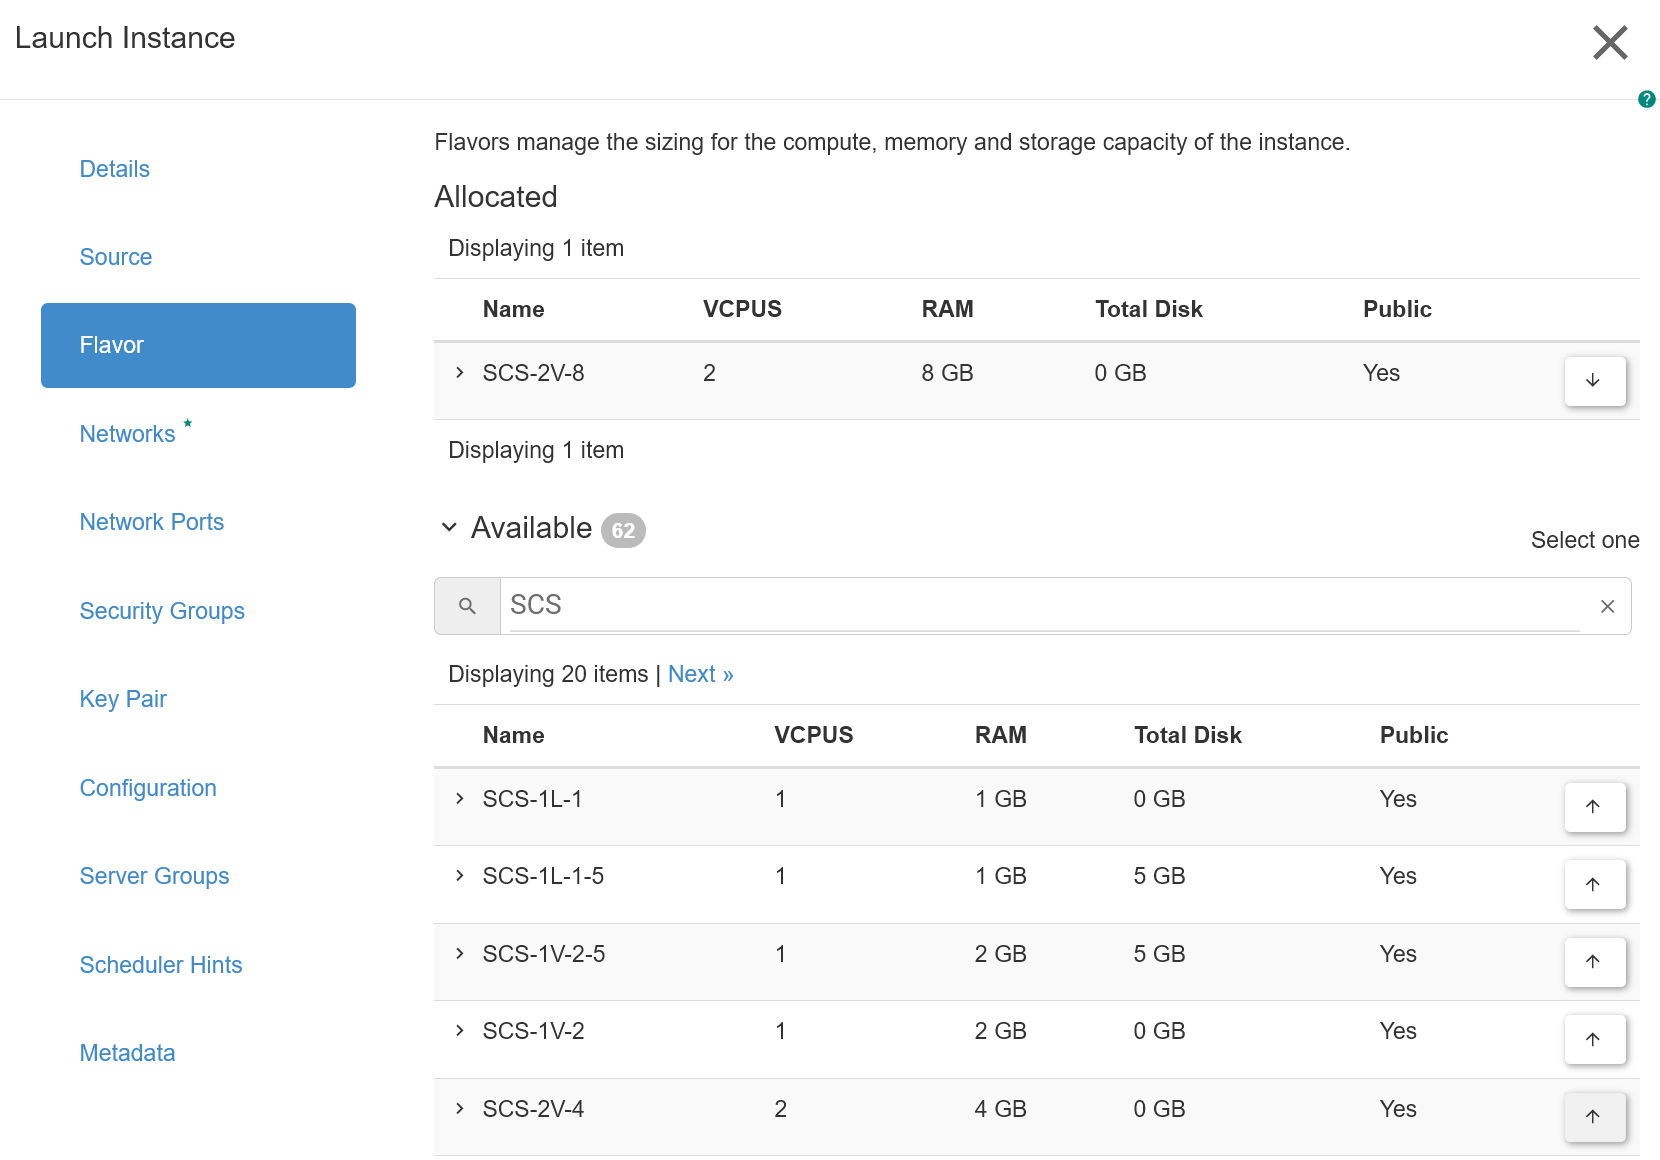
The flavor determines what resources your virtual cloud machine will have. We recommend diskless flavors (disk=0) to allow resizing of root volumes after initial creation. Choose according to your quotas and host requirements:
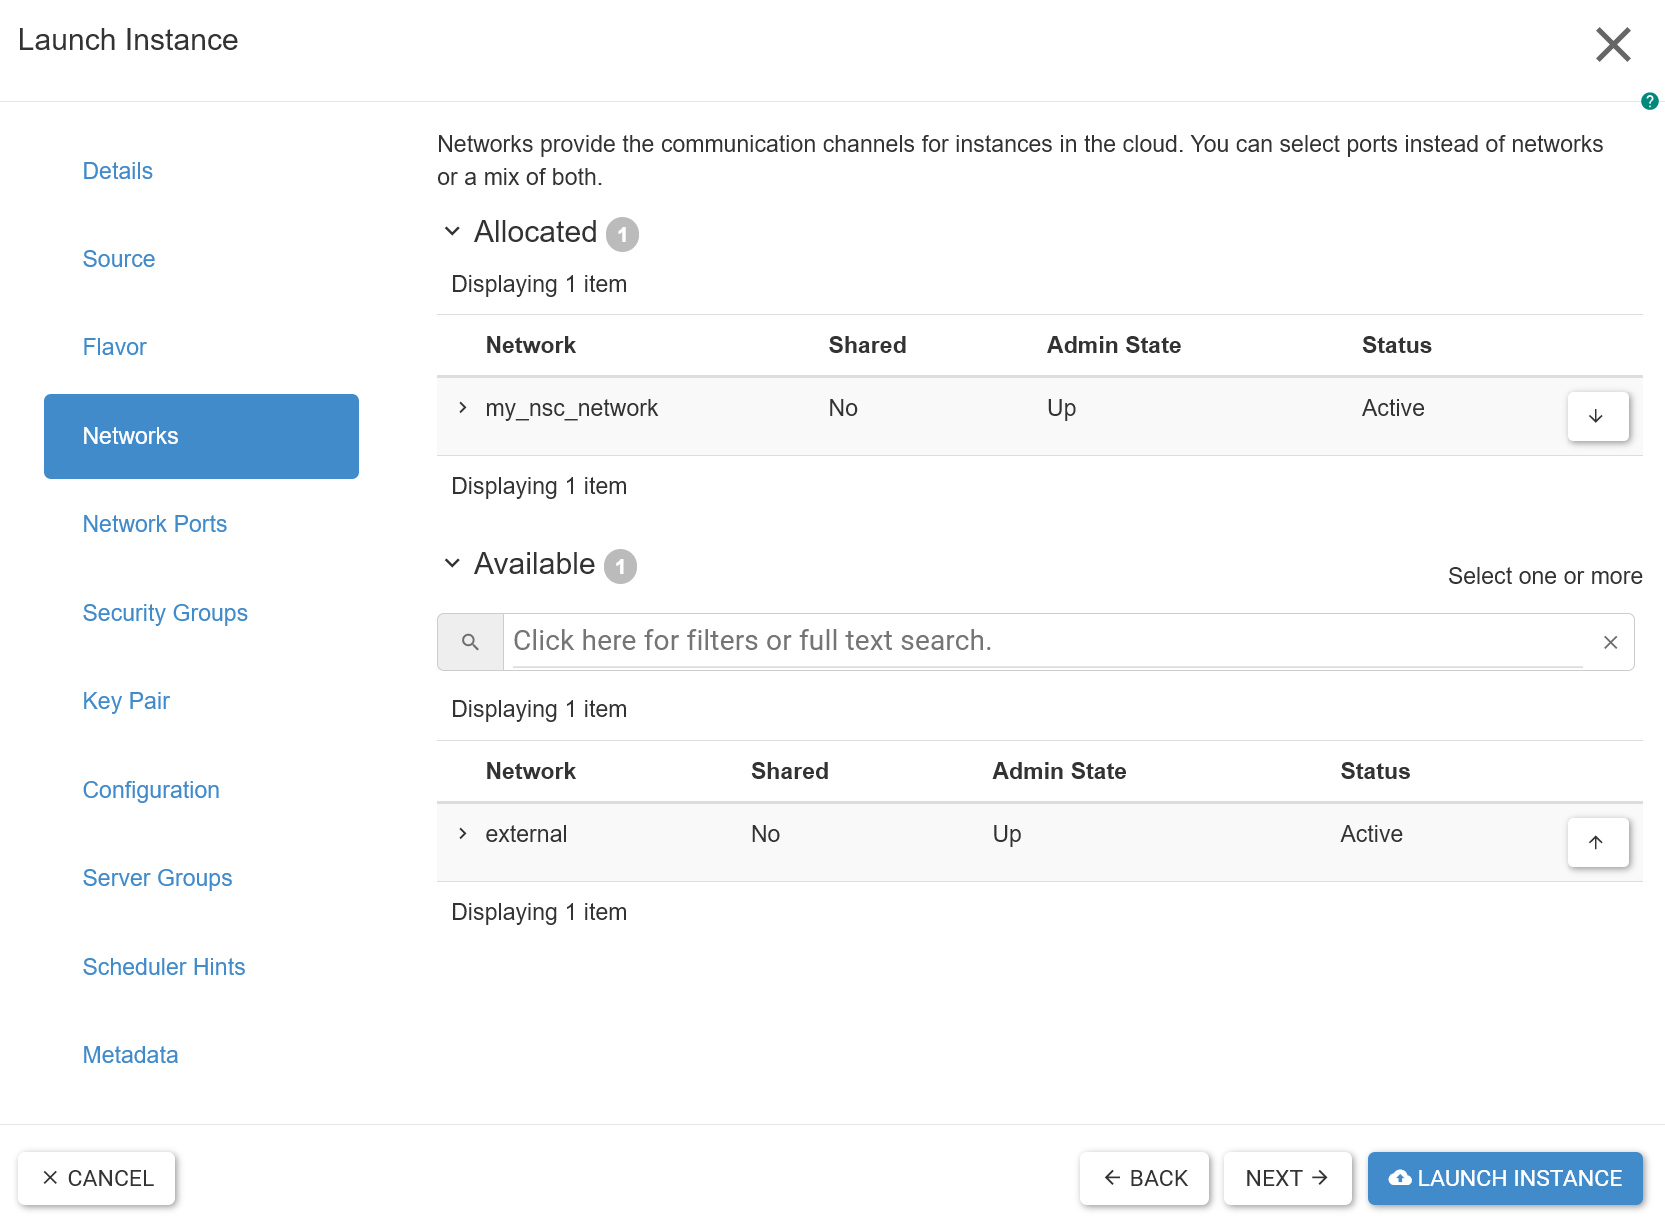
In the “Networks” section, attach the VM to your network my_nsc_network:
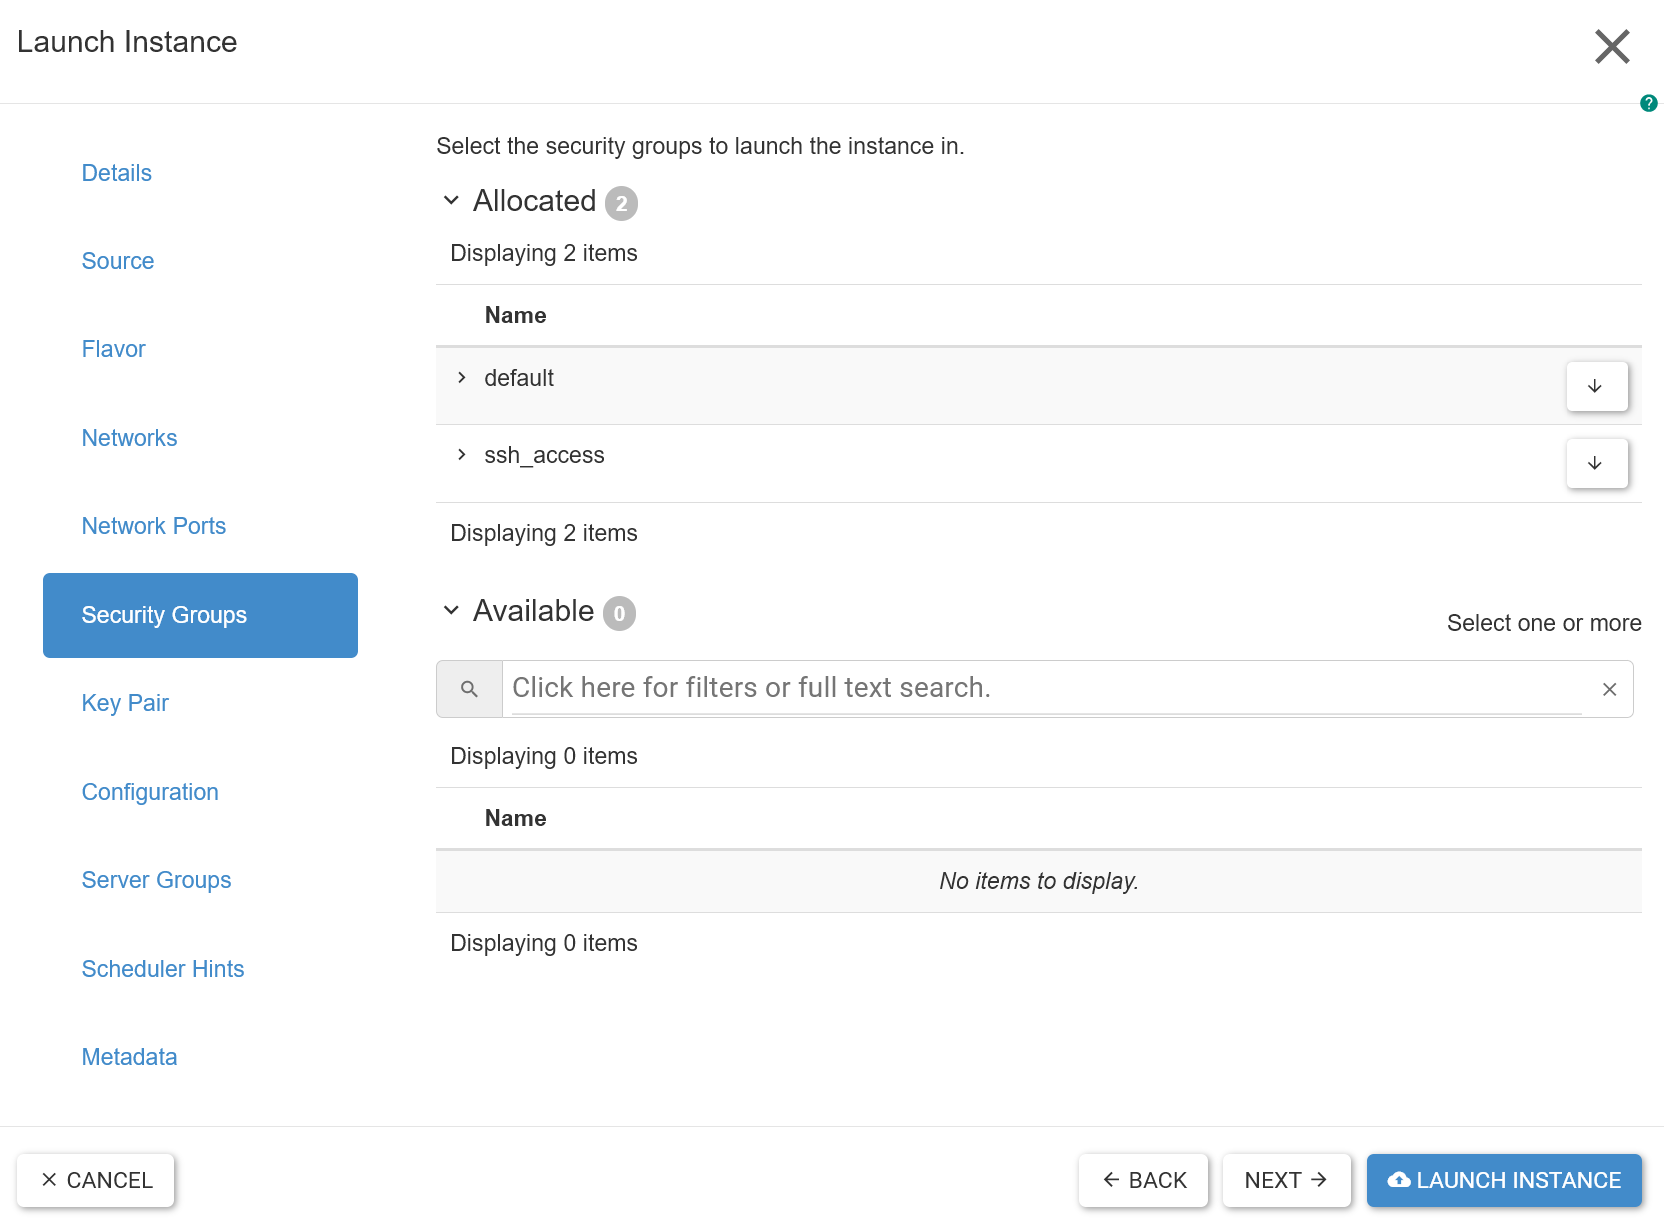
Click on Security Groups. Choose the security group ssh_access we created earlier:
Step 6: Connect Instance to the Internet
Section titled “Step 6: Connect Instance to the Internet”Your compute instance will be associated with a floating IP. It will be drawn from the prebuilt external network and make your instance publicly reachable. As long as you don’t release this IP, it will remain yours, allocated to your OpenStack project.
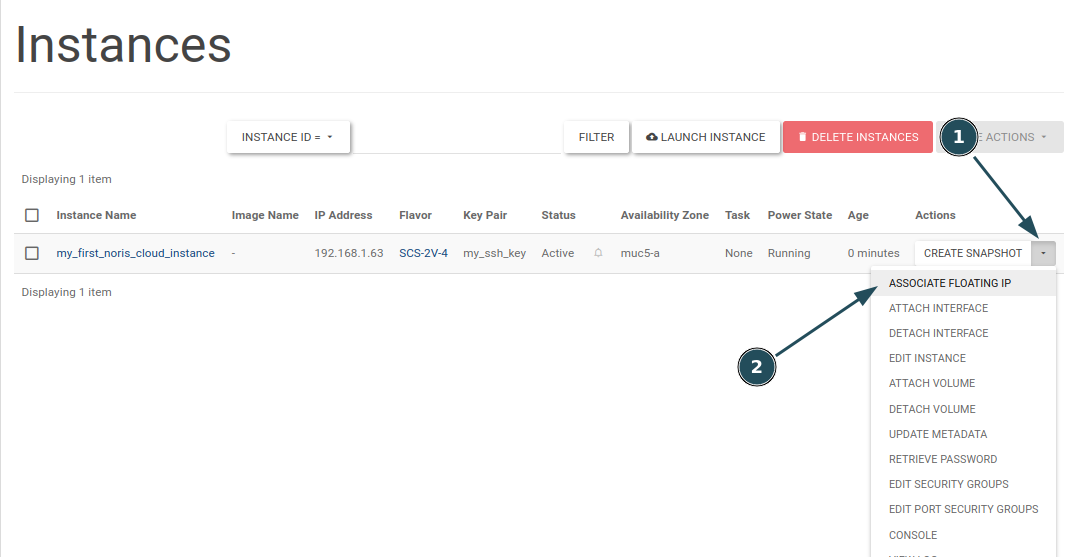
In the dropdown menu of your compute instance, select ASSOCIATE FLOATING IP.
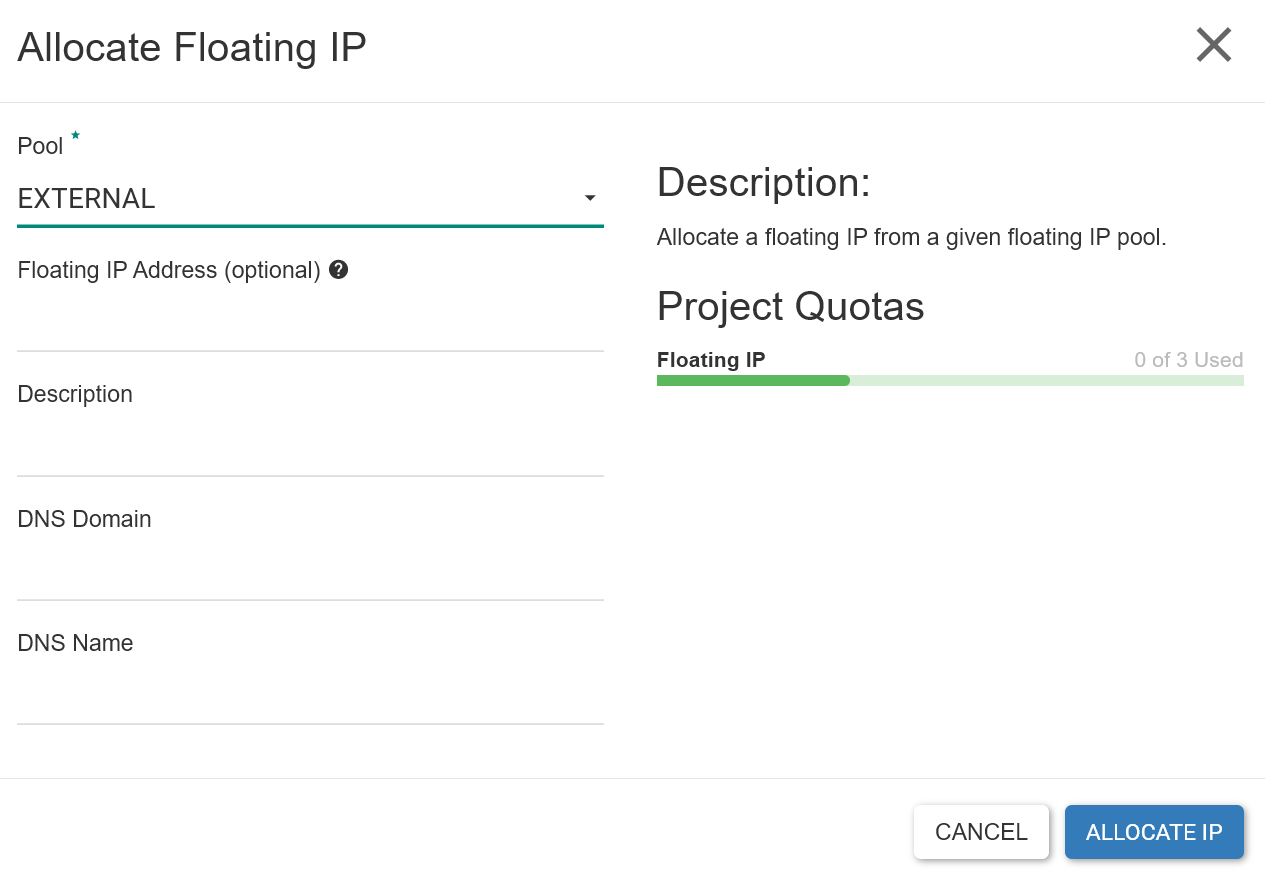
Click the ”+” button.
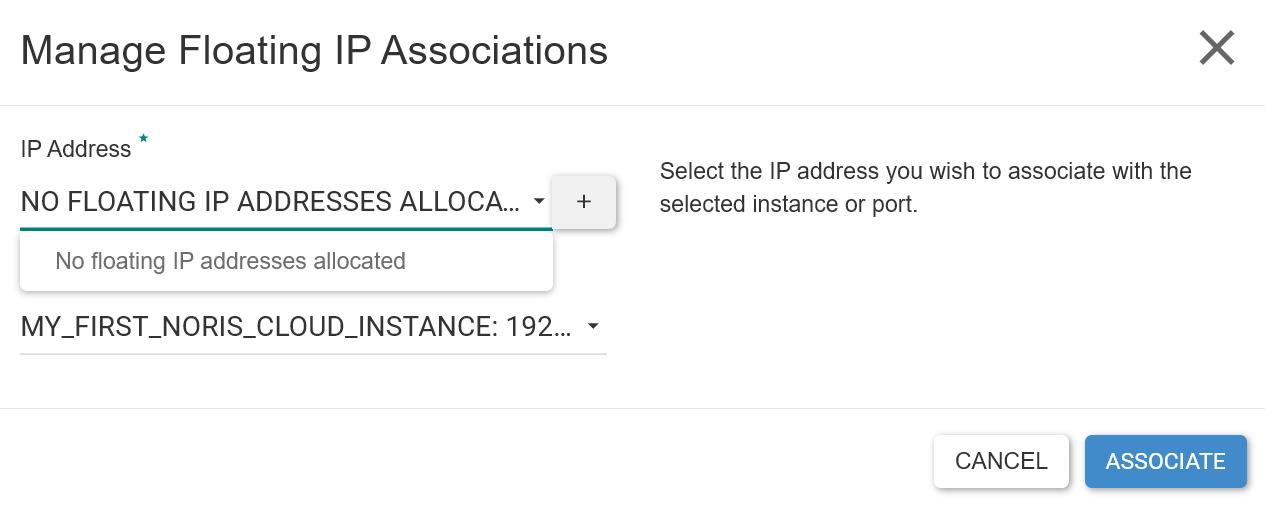
Press ALLOCATE IP:
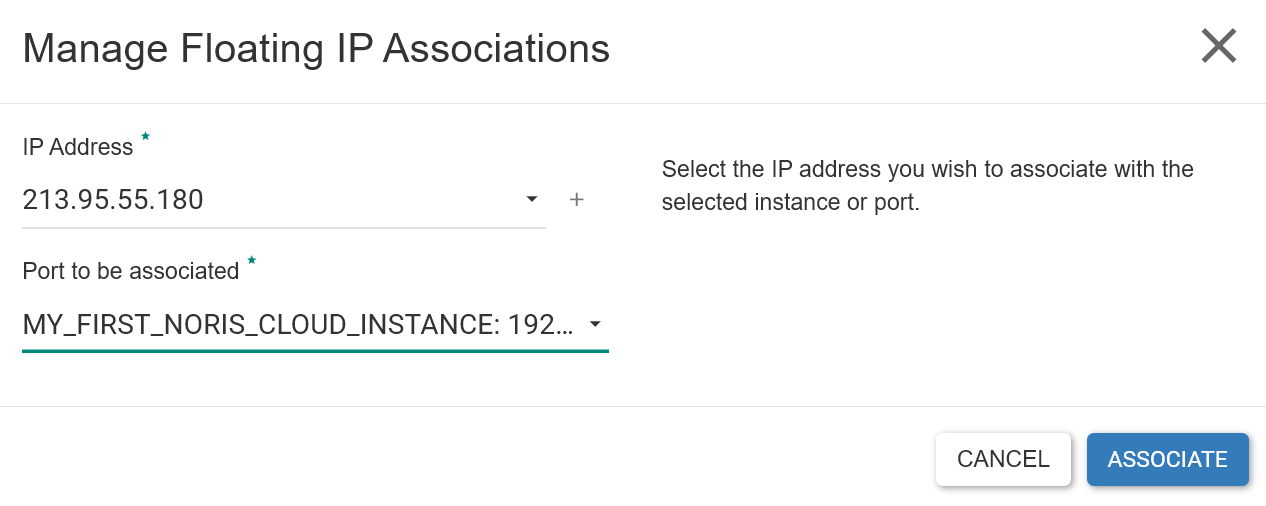
Click ASSOCIATE:
Step 7: Connect via SSH
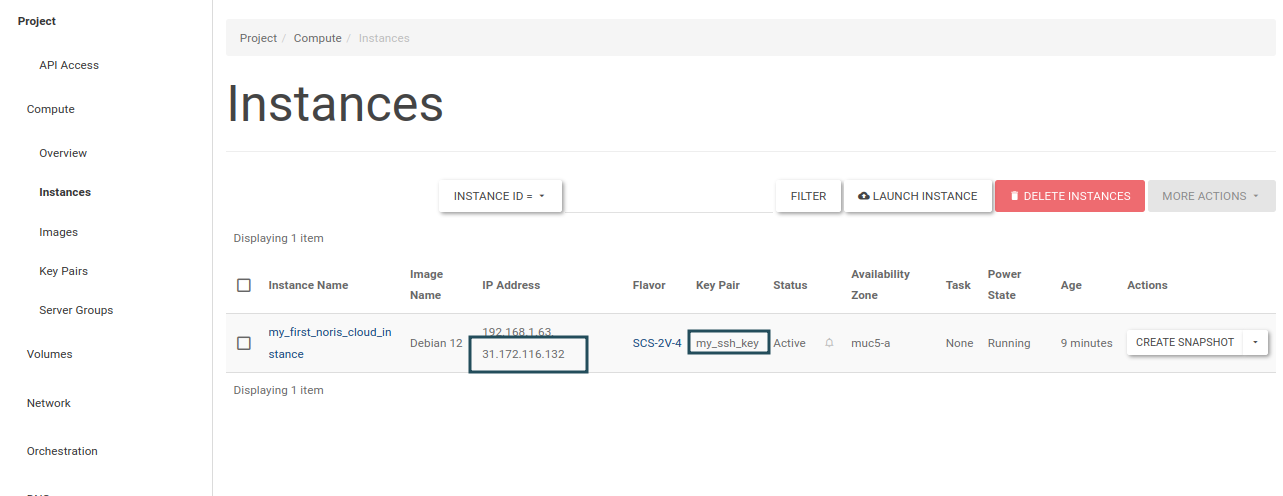
Section titled “Step 7: Connect via SSH”Now you will want to connect to your fresh cloud instance. In the Instances view, you should now see the floating IP as well as the key pair.
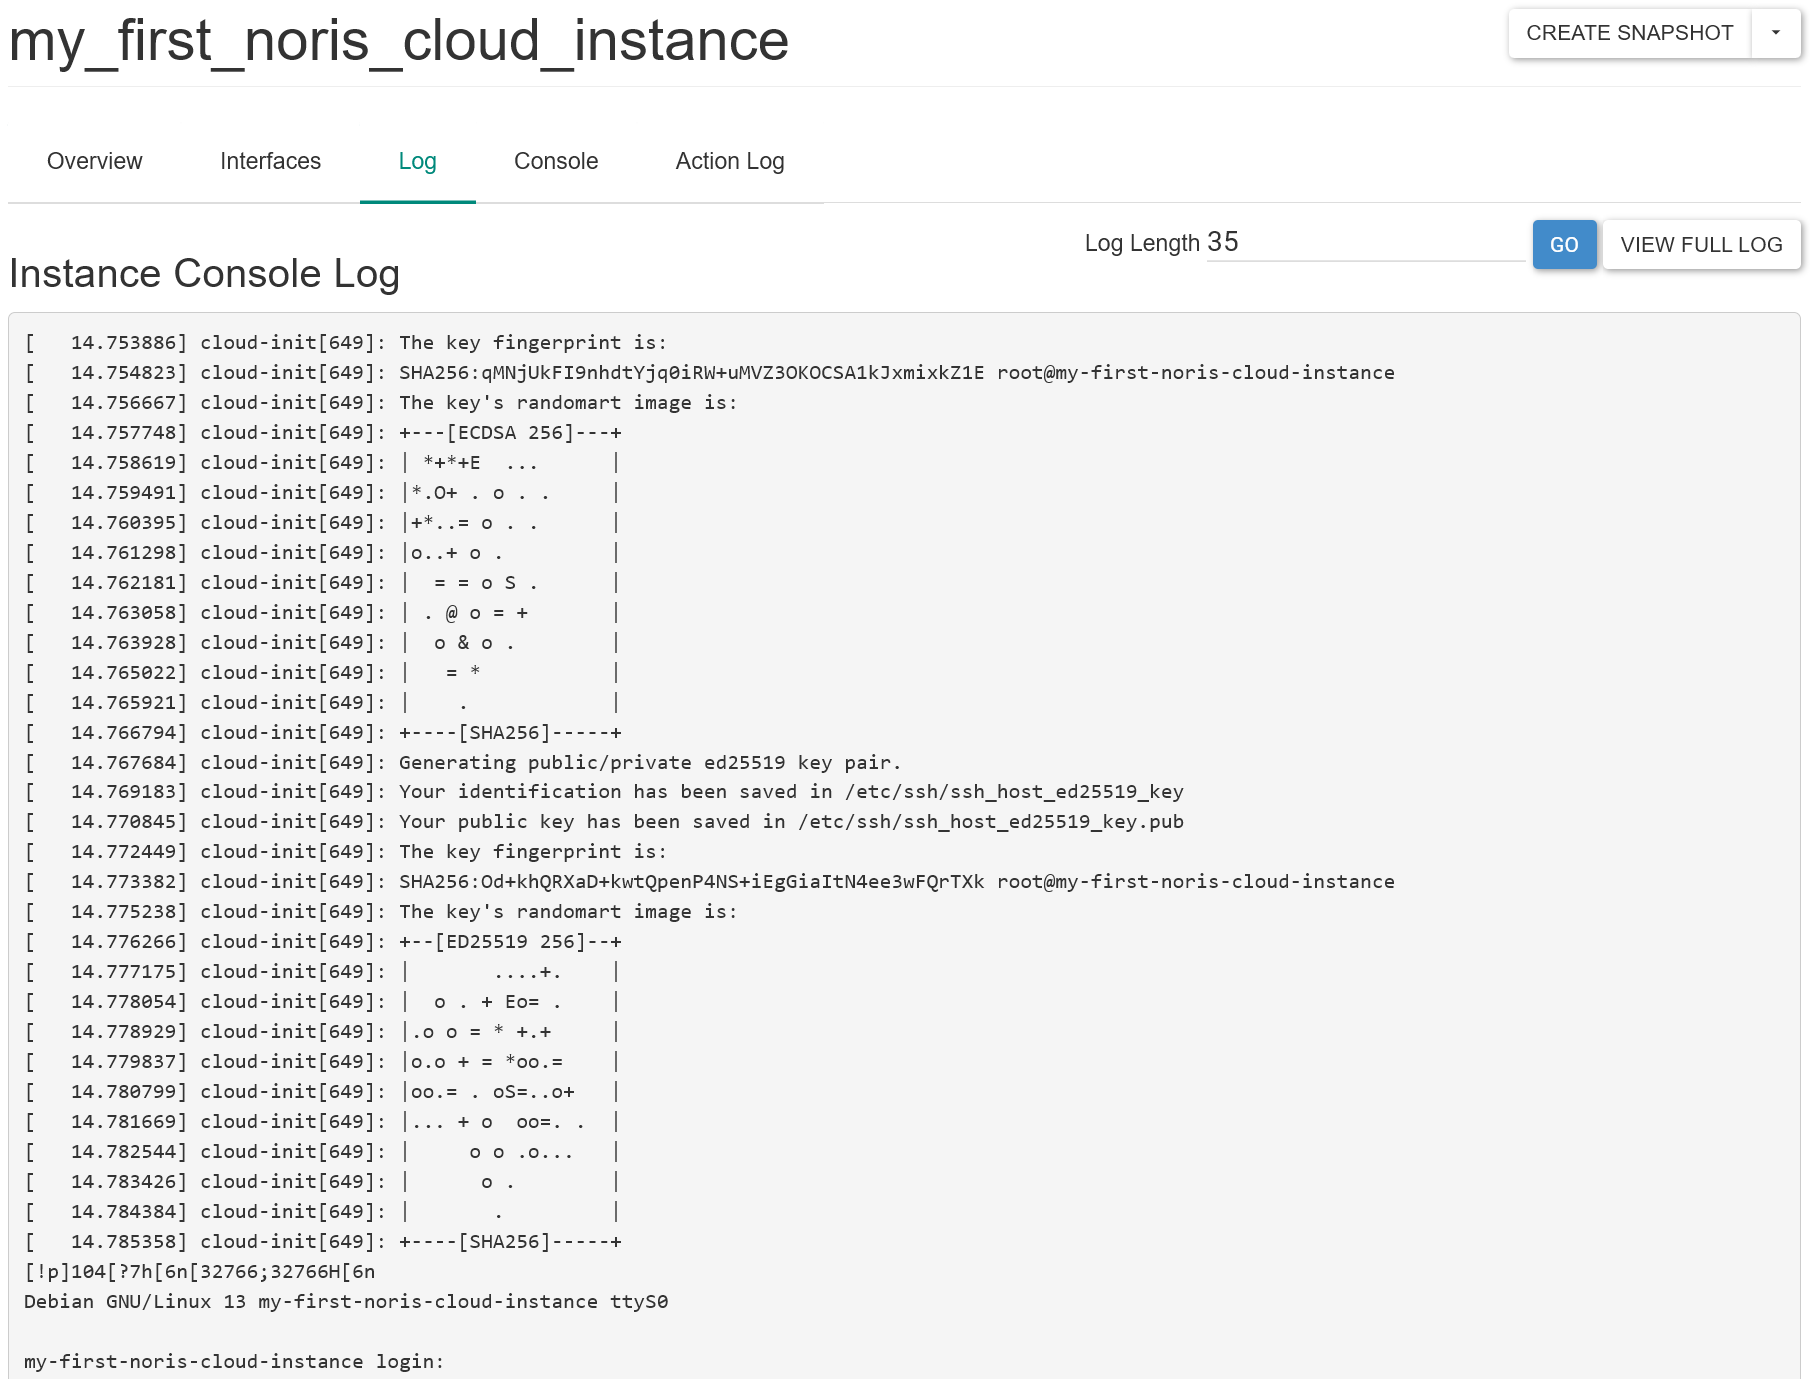
When you select your instance, navigate to Log. You can see the host’s fingerprint, feel free to compare the SSH key’s fingerprint to your local copy:
You can now connect to your new VM.
Using the CLI / Ansible / Terraform
Section titled “Using the CLI / Ansible / Terraform”Our dashboard in Nürnberg (“NBG”) is available here: dashboard.nbg.nsc.noris.cloud. Log in with the provided user from your sign-up email, the domain field stays empty.
OpenStack features a powerful command-line CLI. This guide features usage examples where appropriate. It can be installed by following the official documentation.
Application Credentials
Section titled “Application Credentials”Application credentials are required to utilize the mentioned clients, they let users create credentials specifically for their applications without exposing their personal user passwords. See our separate guide: OpenStack Application Credentials.
Terraform & Ansible
Section titled “Terraform & Ansible”We’ve prepared code examples demonstrating how to integrate nSC with both Terraform and Ansible:
These examples can also be applied to compatible tools such as Pulumi.
Creating the first network
Section titled “Creating the first network”Create a network, it acts as a private network for instances:
openstack network create examplenetworkCreate a subnet named examplesubnet, associated with examplenetwork, that uses the IP address range 192.168.42.0/24. This range defines the IP addresses available in the subnet:
openstack subnet create examplesubnet --network examplenetwork --subnet-range 192.168.42.0/24Create a router and set the external gateway, letting instances on the private network access external networks like the internet through the external network as the gateway:
openstack router create examplerouter --external-gateway externalAdd the subnet interface to the router, linking the subnet to the router interface and enabling routing between the subnet and the external network:
openstack router add subnet examplerouter examplesubnetCreate a security group called examplesecurity, which controls network traffic to instances:
openstack security group create examplesecurityAdd a security group rule for SSH access, which allows all inbound TCP traffic on port 22 (SSH) to instances within the examplesecurity security group (you could optionally restrict source networks too):
openstack security group rule create --ingress --dst-port 22 --protocol tcp examplesecurityCreate access keys
Section titled “Create access keys”Create an SSH keypair for instance access named examplekey, saving the private key locally to the file id_rsa.cloud with secure permissions. This key is used to authenticate SSH access to the instance, you can alternatively upload your existing SSH key.
openstack keypair create examplekey > id_rsa.cloud; chmod 0600 id_rsa.cloudCreate your first VM
Section titled “Create your first VM”Create a virtual machine examplevm with the specified flavor (resource size), image (Debian 12), connecting it to the network examplenetwork, assigning it the security group examplesecurity, using the keypair examplekey, and creating an rbd_fast root volume of size 50 GB. We recommend using diskless flavors (like in this example) to allow retroactive resizing of the root volume after initial creation.
openstack server create --flavor SCS-1V-2 --image 'Debian 12' --key-name examplekey --network examplenetwork --security-group examplesecurity --boot-from-volume 50 examplevmFor creating a VM using LUKS for the root volume, please check our example below.
Use floating IPs to reach it
Section titled “Use floating IPs to reach it”Create a floating (public) IP from the external network, to enable public access to the instance. Please note down your public IP, as you will need it in the next two steps:
openstack floating ip create externalNote down and associate the floating IP to the instance, making it accessible externally:
openstack server add floating ip examplevm 213.95.55.34SSH into the instance using the private key generated earlier and the floating IP address:
ssh -i id_rsa.cloud debian@213.95.55.34As long as you don’t release this IP, it will remain yours, allocated to your OpenStack project.
Congratulations, you have now provisioned and used your first VM! Feel free to stop following this getting started guide if the following advanced options aren’t necessary for your use case.
Resize the VM
Section titled “Resize the VM”Resize the VM examplevm to the flavor SCS-2V-4:
openstack server resize --flavor SCS-2V-4 examplevmVerify that everything is working as expected, and release the old instance afterwards:
openstack server resize confirm examplevmCreating and attaching a volume
Section titled “Creating and attaching a volume”You can create a volume with the following code. It will have 10 GB size, using the rbd_fast volume type. Please choose the same availability zone as your VM, given that volumes are only attachable in the same zone.
openstack volume create --size 10 --type rbd_fast --description "example-volume" --availability-zone <AZ> example-volumeNote down the volume ID to attach it to your server:
openstack server add volume examplevm <volume-id>S3 Object Storage
Section titled “S3 Object Storage”In addition to block storage volumes, nSC also offers object-based cloud storage via the S3-compatible API and the OpenStack Swift API. Documented under S3 Object Storage.
Uploading an OS image
Section titled “Uploading an OS image”When uploading new operating system images, we recommend the QCOW2 format, which is available for most distributions.
openstack image create --disk-format qcow2 --file ./your-image-file.qcow2 exampleimageCreating and utilizing a Loadbalancer
Section titled “Creating and utilizing a Loadbalancer”First we need to create a load balancer. openstack subnet list provides the subnet ID. In this example we will choose the provider OVN.
openstack loadbalancer create --name exampleloadbalancer --provider ovn --vip-subnet-id <subnet_id>Note down the load balancer ID to create a listener:
openstack loadbalancer listener create --name examplevm-listener --protocol TCP --protocol-port 80 <loadbalancer_id>Create a load balancer pool and choose your load balancing algorithm:
openstack loadbalancer pool create --name examplevm-pool --lb-algorithm SOURCE_IP_PORT --listener examplevm-listener --protocol TCP --waitAdd examplevm as a pool member, replace <private-subnet-id> with the subnet ID where examplevm resides, and <examplevm-ip> with the IP address of the examplevm VM:
openstack loadbalancer member create --subnet-id <private-subnet-id> --address <examplevm-ip> --protocol-port 80 --wait <example-pool-id>Create a health monitor to check backend health:
openstack loadbalancer healthmonitor create --delay 5 --max-retries 3 --timeout 10 --type TCP --wait examplevm-poolTo make it reachable via the internet, create a floating IP:
openstack floating ip create externalAfterwards, it can be configured for the VIP port of the load balancer:
openstack floating ip set --port <vip_port_id> <floating_ip_address>Create a VM using LUKS based root volume
Section titled “Create a VM using LUKS based root volume”Check out the images available and note down the appropriate image name:
openstack image listCreate a LUKS volume with the image you noted down, in this example “Debian 12”:
openstack volume create --image "Debian 12" --size 10 --type luks --description "example-luks" --availability-zone <AZ> example-luksAfterwards, the server can be created using the volume example-luks as a basis:
openstack server create --flavor SCS-1V-2 --volume example-luks --key-name examplekey --network examplenetwork --security-group examplesecurity example-luksDeleting elements
Section titled “Deleting elements”Run the same statements as described above, but replace create with delete.
Appendix
Section titled “Appendix”There are a lot more specialized options available in OpenStack, which would derail this guide if fully documented. A few examples of what is possible:
- Volume transfer: transfer a volume to a different project.
- Console log: display the console log of a VM.
- DNS: if you federate a (sub-)domain to us, configuring records in that zone is possible, get in touch!
- Server group: group VMs with affinity or anti-affinity properties, to impact where they are scheduled on physical hosts.
- Volume group: manage volumes together.
Monitoring
Section titled “Monitoring”OpenStack provides basic metrics such as instance status, CPU, RAM, and storage utilization in the Horizon dashboard under Project → Compute → Instances. For more comprehensive monitoring of your VMs, we recommend deploying your own monitoring tools such as Prometheus and Grafana.
Backup and Restore
Section titled “Backup and Restore”For backing up S3 buckets, see S3 Object Storage.
Backup and Restore a Volume
Section titled “Backup and Restore a Volume”Backup via Web Interface
Section titled “Backup via Web Interface”- Go to Project → Volumes → Volumes.
- Choose the desired volume, open the actions menu, and click Create Backup.
- Enter a backup name and, if required, specify a different Availability Zone.
- After completion, the backup will appear under Project → Volumes → Backups with status “available”.
Backup via CLI
Section titled “Backup via CLI”To back up a volume to a specific Availability Zone:
openstack volume backup create --name <BACKUP-NAME> --availability-zone <DESTINATION-ZONE-NAME> <VOLUME-NAME-or-ID>With the --force flag, you can back up volumes that are currently attached (in use), if required. For a full range of parameters, use the --help parameter.
Official documentation: docs.openstack.org/cinder/latest/admin/volume-backups.html
Restoring a Volume via Web Interface
Section titled “Restoring a Volume via Web Interface”- Navigate to Project → Volumes → Backups.
- Select the backup you want to restore.
- Click on Restore Backup.
- Provide a name for the new volume that will be created from the backup.
- Optionally, select an Availability Zone if your OpenStack environment supports this.
- Confirm the restore operation.
- After completion, the restored volume will appear under Project → Volumes → Volumes and will be ready to attach to an instance.
For LUKS backups: Create a new, empty LUKS volume of sufficient size under Project → Volumes → Volumes beforehand and select it as the restore target. Without this step, the restore dialog creates the target volume without offering a volume type choice, producing an unencrypted rbd_fast volume that a LUKS backup cannot be restored into (status “Error Restoring”).
Restoring a Volume via CLI
Section titled “Restoring a Volume via CLI”openstack volume backup restore <BACKUP-ID> <NEW-VOLUME-NAME-or-ID>Attach the volume to your VM afterwards.
For LUKS backups: Create a new, empty LUKS volume of the same size beforehand to serve as the target (see Creating and Attaching a Volume and Create a VM using LUKS-based Root Volume):
openstack volume create --size <SIZE> --type luks --availability-zone <AZ> <NEW-LUKS-VOLUME>Pass the name or ID of this volume as the target when restoring. This shows that the backup is likewise encrypted: restoring into an unencrypted rbd_fast volume instead would fail and leave the volume in the “Error Restoring” state.
Backup and Restore a VM
Section titled “Backup and Restore a VM”A VM is referred to as an instance in OpenStack. The backup-relevant boot sources for an instance are an instance snapshot, a volume, or a volume snapshot. A volume backup must first be restored into a volume before it can be used as a boot source.
Backup via Web Interface
Section titled “Backup via Web Interface”- Navigate to Project → Compute → Instances.
- Locate the desired VM and click on Create Snapshot in the actions menu.
- Specify a name for the snapshot (backup) and confirm creation.
- Once completed, you will find the backup under Project → Compute → Images with status “available”.
Backup via CLI
Section titled “Backup via CLI”To back up a VM using the CLI, run the following command:
openstack server image create --name <SNAPSHOT-NAME> <VM-NAME-OR-ID>The --rotate parameter may be useful to keep a specific number of backups. For a full range of parameters, use the --help parameter.
Restoring a VM
Section titled “Restoring a VM”To restore a VM from a snapshot, launch a new instance according to the VM creation guide above. The only difference is that the image snapshot is used as the source of the instance.
When restoring a LUKS-encrypted instance snapshot, LUKS must again be selected as the volume type. This shows that the data in the instance snapshot image is likewise encrypted.
Important notes regarding backups
Section titled “Important notes regarding backups”- Test the restoration of your backups regularly to ensure data safety and functionality.
- Overwriting existing volumes and VMs isn’t possible, so plan preemptively how switching to the newly restored VMs and volumes should work.
- When a volume is mounted and in use, the operating system and running applications may have data cached in memory or in application buffers. If you back up or snapshot a volume while it’s still mounted and active, recent changes still in memory and not yet written to disk will not be included, this can lead to an inconsistent or “crash-consistent” backup, similar to pulling the power on a server, potentially resulting in data loss or corruption after restore. If your use case requires safety in these circumstances, please unmount the volume before backing up so all in-flight changes are safely persisted to disk, and/or utilize specific application backup utilities, e.g.
pgbackup. - These backups are one-time jobs. To trigger them periodically, you can utilize Application Credentials on a server and run these commands via a cronjob.
Reverse DNS (PTR records)
Section titled “Reverse DNS (PTR records)”Reverse DNS resolves an IP address to a name (PTR record). In the nSC, you set PTR records for IPv4 floating IPs yourself, for example to operate a mail server (many recipients check Forward Confirmed Reverse DNS, FCrDNS) or to make IP addresses in logs easier to read. For IPv6, contact your noris contact person.
Prerequisites
Section titled “Prerequisites”- You have an IPv4 floating IP assigned (see Use floating IPs to reach it).
- The forward DNS record of the desired name must already resolve to the floating IP, so that forward and reverse resolution are consistent (FCrDNS).
- The PTR record cannot be set during floating IP creation in Horizon; it is configured as a separate subsequent step.
Via the OpenStack dashboard (Horizon)
Section titled “Via the OpenStack dashboard (Horizon)”- Navigate to Project → Network → DNS → Reverse DNS.
- Select the desired IPv4 floating IP from the list.
- Click Set.
- Enter the fully qualified domain name in the Domain Name field, including the trailing dot (e.g.
mail.example.com.). - Confirm the entry.
Via the CLI
Section titled “Via the CLI”First, obtain the ID of the floating IP:
openstack floating ip listSet the PTR record. The name is the FQDN with a trailing dot:
openstack ptr record set <floating_ip_id> mail.example.com.Verify the record:
openstack ptr record show <floating_ip_id>Remove the record with:
openstack ptr record unset <floating_ip_id>For IPv6 addresses, reverse DNS is not self-service. Contact your noris contact person for IPv6 PTR records via a support ticket.
Verifying resolution
Section titled “Verifying resolution”Verify resolution with dig:
dig -x 213.95.55.34The PTR record lives in the in-addr.arpa zone and is published automatically by the nSC. Propagation is near-instantaneous.
- FCrDNS: Many mail recipients check whether forward and reverse resolution of the sender IP match. Ensure the forward DNS of the registered name points to the same IP.
- Address release: Releasing the floating IP also drops the PTR record. The IP itself cannot be recovered afterward (see Use floating IPs to reach it).
- Higher volume or IPv6: Contact your noris contact person.
Known issues
Section titled “Known issues”Password Change fails in OpenStack Dashboard
Section titled “Password Change fails in OpenStack Dashboard”Trying to change your user’s password in OpenStack will fail, since all identity and access management (IAM) for nSC is handled by the noris Sovereign Cloud Identity Provider (Zitadel) at id.nbg.nsc.noris.cloud. If you want to change your password, change it in your IAM user settings.
Facts and numbers
Section titled “Facts and numbers”Storage Types
Section titled “Storage Types”Block Storage
Section titled “Block Storage”| Property | rbd_fast | LUKS | SSD |
|---|---|---|---|
| Alternative names | cinder | Ephemeral SSD, NVMe | |
| Average IOPS | 3000 | 3000 | 5000 |
| Burst IOPS | 10000 | 10000 | 20000 |
| Average Throughput | 250 MB/s | 250 MB/s | 500 MB/s |
| Burst Throughput | 500 MB/s | 500 MB/s | 1000 MB/s |
| Type | Block storage | Block storage | Block storage |
| Provisioning | root volume, attached volume, k8s StorageClass | root volume, attached volume, k8s StorageClass | root volume |
| Access Pattern | ReadWriteOnce (RWO) | ReadWriteOnce (RWO) | ReadWriteOnce (RWO) |
| Availability | Network-attached, within a single zone | Network-attached, within a single zone | Local storage: within the same physical host |
| Redundancy | Zone-internal | Zone-internal | Same host |
| Encryption | No | Default, strong encryption | No |
| Access Control | OpenStack/Kubernetes roles | OpenStack/Kubernetes roles | OpenStack/Kubernetes roles |
| Backup | Managed by customer | Managed by customer | Managed by customer |
| Description | Our default storage. Ceph RBD-based and network-attached. With sufficient retrieval size, we can provide more than 15000 IOPS, please contact us. | Like rbd_fast but with added automated encryption. | Local SSD/NVMe-backed storage, only available as root storage. Please note the caveats below before creating instances with this storage type. |
In addition to block storage, we also offer S3 Object Storage, documented on a separate page.
Instance flavors
Section titled “Instance flavors”We follow the Sovereign Cloud Stack naming standard.
Network attached storage flavors
Section titled “Network attached storage flavors”These flavors with attached storage are the recommended flavors for general purposes. We recommend using diskless (disk=0) flavors, given that diskful flavors can’t retroactively resize their root volume:
| Flavor | vCPU | Memory (GiB) | Disk (GiB) | Disk Type | Average Bandwidth (Gbit/s) | Peak Bandwidth (Gbit/s) |
|---|---|---|---|---|---|---|
| SCS-1V-2 | 1 | 2 | 0 | LUKS / rbd_fast | 0.512 | 1.024 |
| SCS-1V-2-5 | 1 | 2 | 5 | rbd_fast | 0.512 | 1.024 |
| SCS-1V-4 | 1 | 4 | 0 | LUKS / rbd_fast | 0.512 | 1.024 |
| SCS-1V-4-10 | 1 | 4 | 10 | rbd_fast | 0.512 | 1.024 |
| SCS-1V-8 | 1 | 8 | 0 | LUKS / rbd_fast | 0.512 | 1.024 |
| SCS-1V-8-20 | 1 | 8 | 20 | rbd_fast | 0.512 | 1.024 |
| SCS-1V-16 | 1 | 16 | 0 | LUKS / rbd_fast | 0.512 | 1.024 |
| SCS-1V-16-50 | 1 | 16 | 50 | rbd_fast | 0.512 | 1.024 |
| SCS-2V-4 | 2 | 4 | 0 | LUKS / rbd_fast | 0.512 | 1.024 |
| SCS-2V-4-10 | 2 | 4 | 10 | rbd_fast | 0.512 | 1.024 |
| SCS-2V-8 | 2 | 8 | 0 | LUKS / rbd_fast | 0.512 | 1.024 |
| SCS-2V-8-20 | 2 | 8 | 20 | rbd_fast | 0.512 | 1.024 |
| SCS-2V-16 | 2 | 16 | 0 | LUKS / rbd_fast | 0.512 | 1.024 |
| SCS-2V-16-50 | 2 | 16 | 50 | rbd_fast | 0.512 | 1.024 |
| SCS-2V-32 | 2 | 32 | 0 | LUKS / rbd_fast | 0.512 | 1.024 |
| SCS-2V-32-100 | 2 | 32 | 100 | rbd_fast | 0.512 | 1.024 |
| SCS-4V-8 | 4 | 8 | 0 | LUKS / rbd_fast | 1.25 | 2.5 |
| SCS-4V-8-20 | 4 | 8 | 20 | rbd_fast | 1.25 | 2.5 |
| SCS-4V-16 | 4 | 16 | 0 | LUKS / rbd_fast | 1.25 | 2.5 |
| SCS-4V-16-50 | 4 | 16 | 50 | rbd_fast | 1.25 | 2.5 |
| SCS-4V-32 | 4 | 32 | 0 | LUKS / rbd_fast | 1.25 | 2.5 |
| SCS-4V-32-100 | 4 | 32 | 100 | rbd_fast | 1.25 | 2.5 |
| SCS-4V-64 | 4 | 64 | 0 | LUKS / rbd_fast | 1.25 | 2.5 |
| SCS-4V-64-200 | 4 | 64 | 200 | rbd_fast | 1.25 | 2.5 |
| SCS-8V-16 | 8 | 16 | 0 | LUKS / rbd_fast | 1.25 | 2.5 |
| SCS-8V-16-50 | 8 | 16 | 50 | rbd_fast | 1.25 | 2.5 |
| SCS-8V-32 | 8 | 32 | 0 | LUKS / rbd_fast | 1.25 | 2.5 |
| SCS-8V-32-100 | 8 | 32 | 100 | rbd_fast | 1.25 | 2.5 |
| SCS-8V-64 | 8 | 64 | 0 | LUKS / rbd_fast | 1.25 | 2.5 |
| SCS-8V-64-200 | 8 | 64 | 200 | rbd_fast | 1.25 | 2.5 |
| SCS-16V-32 | 16 | 32 | 0 | LUKS / rbd_fast | 2.5 | 5 |
| SCS-16V-32-100 | 16 | 32 | 100 | rbd_fast | 2.5 | 5 |
| SCS-16V-64 | 16 | 64 | 0 | LUKS / rbd_fast | 2.5 | 5 |
| SCS-16V-64-200 | 16 | 64 | 200 | rbd_fast | 2.5 | 5 |
| SCS-16V-128 | 16 | 128 | 0 | LUKS / rbd_fast | 2.5 | 5 |
| SCS-16V-128-500 | 16 | 128 | 500 | rbd_fast | 2.5 | 5 |
| SCS-32V-64 | 32 | 64 | 0 | LUKS / rbd_fast | 2.5 | 5 |
| SCS-32V-64-200 | 32 | 64 | 200 | rbd_fast | 2.5 | 5 |
| SCS-32V-128 | 32 | 128 | 0 | LUKS / rbd_fast | 2.5 | 5 |
| SCS-32V-128-500 | 32 | 128 | 500 | rbd_fast | 2.5 | 5 |
| SCS-32V-256 | 32 | 256 | 0 | LUKS / rbd_fast | 5 | 10 |
| SCS-32V-256-1000 | 32 | 256 | 1000 | rbd_fast | 5 | 10 |
| SCS-64V-128 | 64 | 128 | 0 | LUKS / rbd_fast | 5 | 10 |
| SCS-64V-128-500 | 64 | 128 | 500 | rbd_fast | 5 | 10 |
| SCS-64V-256 | 64 | 256 | 0 | LUKS / rbd_fast | 5 | 10 |
| SCS-64V-256-1000 | 64 | 256 | 1000 | rbd_fast | 5 | 10 |
Ephemeral SSD flavors
Section titled “Ephemeral SSD flavors”These flavors feature SSDs slotted directly in the servers hosting the VMs.
| Flavor | vCPU | Memory (GiB) | Disk (GiB) | Disk Type | Average Bandwidth (Gbit/s) | Peak Bandwidth (Gbit/s) |
|---|---|---|---|---|---|---|
| SCS-1V-8-20s | 1 | 8 | 20 | ssd | 1.25 | 2.5 |
| SCS-2V-4-20s | 2 | 4 | 20 | ssd | 1.25 | 2.5 |
| SCS-2V-8-20s | 2 | 8 | 20 | ssd | 1.25 | 2.5 |
| SCS-2V-16-50s | 2 | 16 | 50 | ssd | 1.25 | 2.5 |
| SCS-4V-16-50s | 4 | 16 | 50 | ssd | 1.25 | 2.5 |
| SCS-4V-16-100s | 4 | 16 | 100 | ssd | 1.25 | 2.5 |
| SCS-4V-32-100s | 4 | 32 | 100 | ssd | 2.5 | 5 |
| SCS-4V-64-200s | 4 | 64 | 200 | ssd | 2.5 | 5 |
| SCS-8V-32-100s | 8 | 32 | 100 | ssd | 2.5 | 5 |
| SCS-8V-64-200s | 8 | 64 | 200 | ssd | 2.5 | 5 |
| SCS-16V-64-200s | 16 | 64 | 200 | ssd | 2.5 | 5 |
| SCS-16V-128-500s | 16 | 128 | 500 | ssd | 2.5 | 5 |
| SCS-32V-128-500s | 32 | 128 | 500 | ssd | 5 | 10 |
| SCS-32V-256-1000s | 32 | 256 | 1000 | ssd | 5 | 10 |
| SCS-64V-256-1000s | 64 | 256 | 1000 | ssd | 5 | 10 |
Budget Optimized
Section titled “Budget Optimized”These instances are offered at a lower cost and should only be considered for non-critical workloads.
| Flavor | vCPU | Memory (GiB) | Disk (GiB) | Disk Type | Average Bandwidth (Gbit/s) | Peak Bandwidth (Gbit/s) |
|---|---|---|---|---|---|---|
| SCS-1L-1 | 1 | 1 | 0 | LUKS / rbd_fast | 0.512 | 1 |
| SCS-1L-1-5 | 1 | 1 | 5 | rbd_fast | 0.512 | 1 |
Default OS Images
Section titled “Default OS Images”Each of these operating system variants is kept up to date and maintained until their security support ends:
- AlmaLinux
- Debian
- Fedora
- Rocky Linux
- Ubuntu LTS
- Ubuntu Minimal LTS
Default Quotas
Section titled “Default Quotas”The following default quotas apply per project. If needed, you can request an increase via your technical contact:
- Instances: 10
- Cores: 20
- RAM: 51200 MiB
- Volumes: 200
- Volume gigabytes: 1000
- Snapshots: 10
- Backups: 10
- Backup gigabytes: 1000
- Floating IPs: 3
- Networks: 100
- Subnets: 100
- Routers: 10
- Ports: 500
- Security groups: 10
- Security group rules: 100
- RBAC policies: 10
- Key pairs: 100
- Server groups: 10
- Server group members: 10
- Groups: 10
Per volume type (rbd_fast, LUKS), volumes, gigabytes, and snapshots are unlimited (-1). The maximum size of a single volume is not limited (-1).
Cloud points
Section titled “Cloud points”The cloud points per resource and an interactive consumption calculator are available in the cloud points calculator.
Usage examples
Section titled “Usage examples”This section gathers usage examples which may serve as inspiration for implementing more complicated setups. They are intended as a guideline and may only touch on more advanced topics, so please use caution when implementing similar setups. We assume you already know how to configure the tools, or that you will follow the official documentation.
OPNsense VPN gateway VM
Section titled “OPNsense VPN gateway VM”This example shows how to run an OPNsense VM in nSC as a VPN gateway between your on-premises/internal networks and the nSC WAN network using IPSec (IPSec configuration itself is out of scope here). The OPNsense firewall will route traffic between two internal networks in nSC and the WAN network.
Network setup
Section titled “Network setup”Create the following networks in OpenStack:
- WAN network
opn-wan- CIDR:
192.168.100.0/24 - Gateway:
192.168.100.1
- CIDR:
- Internal network
internal1- CIDR:
192.168.101.0/24 - Option: “Disable Gateway”
- CIDR:
- Internal network
internal2- CIDR:
192.168.102.0/24 - Option: “Disable Gateway”
- CIDR:
Then create a router:
- Create an OpenStack router that:
- Uses
externalas its external gateway network. - Has an interface in
opn-wanwith router IP192.168.100.1.
- Uses
- This router provides connectivity from
opn-wanto the internet via theexternalnetwork.
OPNsense deployment
Section titled “OPNsense deployment”- Download the OPNsense ISO (
.iso.bz2) from the official project site, and unpack it so you have a.isofile, for exampleOPNsense-26.1-dvd-amd64.iso. - Upload the ISO as an image in OpenStack:
openstack image create --disk-format iso --file OPNsense-26.1-dvd-amd64.iso --property hw_rescue_device=disk --property hw_rescue_bus=virtio OPNsense
- Create a VM using this OPNsense image.
- Boot the VM. After the first boot, you will attach the networks as described below.
Network interfaces
Section titled “Network interfaces”Attach the networks to the OPNsense VM as follows:
WAN:
- Attach the VM to the
opn-wannetwork. - Assign a floating IP to the port in
opn-wanso that the OPNsense GUI is reachable from the internet. - In the VM’s port settings for the
opn-wanport, disable “Port Security”.- Warning: disabling port security turns off Security Groups for this port. All filtering for this interface must be handled by OPNsense itself.
Internal networks:
- Attach the VM to
internal1. This interface will appear asvtnet1. Disable “Port Security” on this port. - Attach the VM to
internal2. This interface will appear asvtnet2. Disable “Port Security” on this port as well.
After attaching the networks, the VM should have three interfaces (order may vary, names refer to VirtIO devices):
vtnet0: WAN (opn-wan)vtnet1:internal1vtnet2:internal2
OPNsense configuration (console)
Section titled “OPNsense configuration (console)”Assign interfaces:
- Choose “Assign Interfaces”, you should see three VirtIO interfaces:
vtnet0,vtnet1,vtnet2(VirtIO Networking Adapter). - Assign:
WAN→vtnet0,LAN→vtnet1,OPT1→vtnet2.
Set interface IP addresses:
- WAN: use DHCP, or set a static IP:
192.168.100.2/24, gateway192.168.100.1, nameservers62.128.1.42and62.128.1.53. - LAN: IP
192.168.101.1/24(gateway forinternal1). - OPT1: IP
192.168.102.1/24(gateway forinternal2).
After this step, OPNsense will act as the default gateway for the two internal networks.
OPNsense GUI access
Section titled “OPNsense GUI access”Once IPs and routes are configured, the OPNsense web GUI should be reachable at https://<floating-ip>/ (the floating IP attached to the WAN interface port in opn-wan). This means it’s reachable from the internet, so please secure it adequately.
You can now:
- Configure firewall rules for WAN, LAN, and OPT1.
- Configure IPSec tunnels to your remote site so that traffic from
internal1andinternal2is routed through the VPN to your on-premises network.